
Solar outdoor lighting has come a long way. Gone are the days of dim, flickering stakes that barely made a dent in the darkness. Today’s solar lights deliver genuine brightness, run through full nights on a single charge, and require zero ongoing electricity costs, a win for both your wallet and the environment. Whether you’re lighting a pathway, securing your perimeter, or adding ambiance to a patio, solar outdoor lights offer a practical, maintenance-light solution that any homeowner can install in an afternoon. This guide walks you through selecting, installing, and maintaining solar lights to get the most from your investment.
Table of Contents
ToggleKey Takeaways
- Solar for outdoor lights eliminates ongoing electricity costs, permits, trenching, and electrician visits while requiring just basic tools for a simple afternoon installation.
- Select solar outdoor lights based on brightness needs (50–150 lumens for paths, 200–500+ for spotlights), placement, and style, prioritizing high-efficiency LEDs that maximize battery life.
- Position solar panels to face true south with 6–8 hours of unobstructed daily sunlight, and wipe panels monthly to prevent 10–20% efficiency loss from dust and pollen buildup.
- Match battery capacity (mAh) to your timeline: mid-range fixtures (800–1200 mAh) suit dusk-to-midnight use, while higher-capacity or dimmer models handle dusk-to-dawn runtimes.
- Combine multiple fixture types—path lights as your foundation, motion-sensor models for security, and spotlights for accent—to create balanced, layered outdoor illumination.
- Quality mid-to-premium solar lights ($15–40 per fixture) deliver reliable all-night performance and multi-season durability, while budget models under $10 typically disappoint on brightness and lifespan.
Why Solar Outdoor Lights Are Worth the Investment
The math is straightforward: solar lights cost nothing to operate once installed. Unlike hardwired landscape lighting that draws from your home’s electrical panel and racks up utility bills, solar fixtures generate their own power during daylight and store it in rechargeable batteries for nighttime use.
Beyond cost savings, solar lights sidestep the permitting and trenching headaches of hardwired systems. You won’t need an electrician, a permit, or the hassle of digging through your yard to run conduit. Installation takes basic tools and an hour of your time. And if you move? Pack them up and take them with you, they’re not tied to your home‘s infrastructure.
Today’s solar technology also delivers real brightness. High-efficiency LEDs paired with decent battery capacity mean modern solar path lights and motion-sensor models genuinely illuminate spaces, not just mark them. Outdoor motion detector lights with solar power are now robust enough for security applications, and outdoor light motion sensor models automatically activate when movement is detected, adding both safety and energy efficiency.
Choosing the Right Solar Lights for Your Space
Solar light selection hinges on three factors: brightness needs, placement, and style. Start by asking yourself what you’re actually lighting. A pathway that gets foot traffic needs different specs than a security-focused motion-sensor setup or decorative patio accent lighting.
Comparing Solar Light Types and Styles
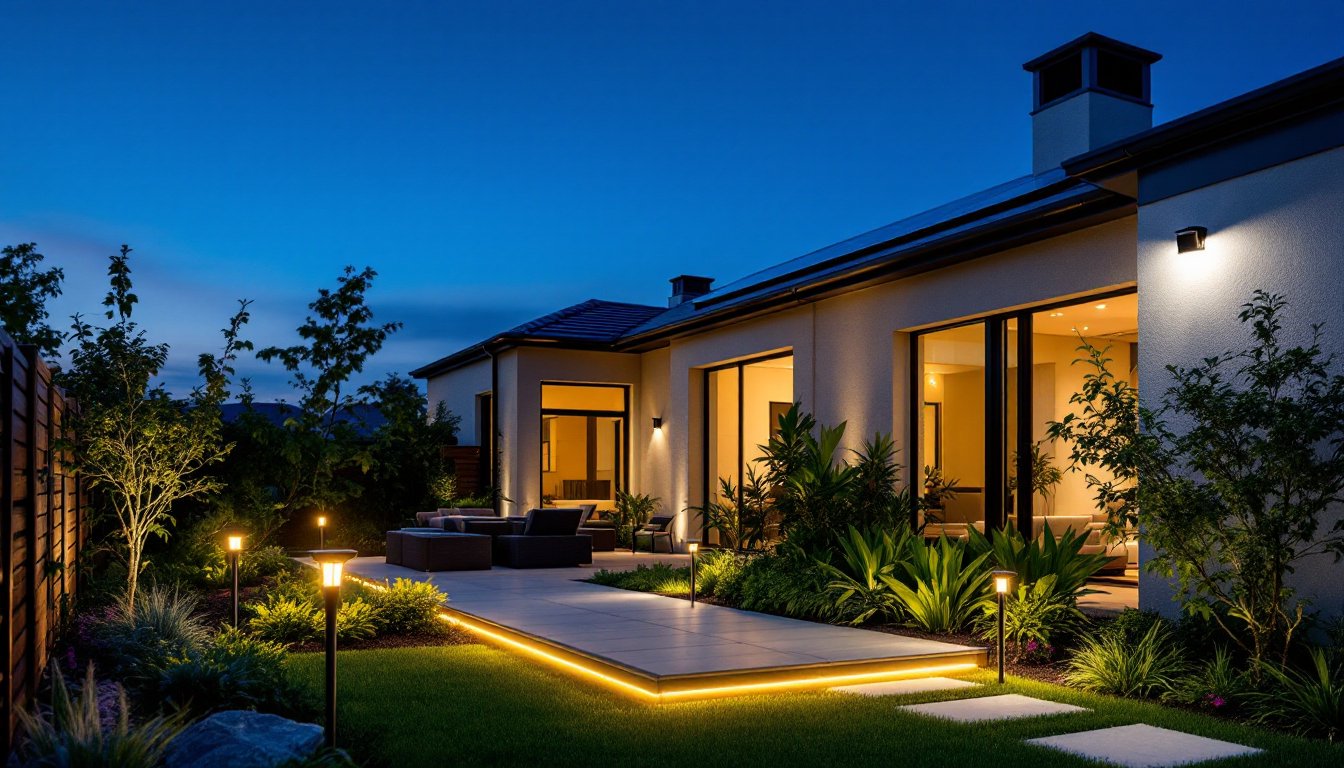
Path lights are the workhorses of solar outdoor lighting. These stake-mounted fixtures cast a modest pool of light, typically 50–150 lumens, and work well for walkways and garden beds. Stakes sit 12–18 inches tall and blend into landscaping during the day.
Spot lights and floodlights deliver more punch, 200–500+ lumens. Use these for uplighting trees, accent walls, or security zones. They sit on adjustable mounts and require a bit more planning because they’re more visible by day.
Outdoor motion detector lights combine detection with solar power for security-minded installations. A quality outdoor motion sensor model activates at dusk and only fires its LED when motion registers within a set range (typically 10–30 feet). These use more battery power in one brief burst than a steady path light, so expect slightly shorter runtimes if motion is frequent.
String and lantern styles lean decorative but still pull their weight in ambient lighting. These work for patios and seating areas where you want vibe alongside function.
When you’re comparing options, LED landscape lighting has become the standard across all solar products. The efficiency gains are real, LEDs use a fraction of the power of older halogen or incandescent tech, meaning your battery lasts far longer per charge.
Matching Lights to Your Outdoor Layout
Map your space before buying. Sketch your yard, noting where you want illumination: entryways, steps, pathways, focal points (a water feature, specimen plant, architectural detail), and security zones (garage entry, deck perimeter).
Consider sun exposure. Solar panels need 6–8 hours of direct sunlight daily to fully charge. If your yard is shaded by trees, a fence, or nearby buildings, that window shrinks, and nighttime runtime takes a hit. Shade-challenged spots may need higher-capacity lights or more frequent repositioning to sunnier spots.
Brightness also needs context. A 100-lumen path light is plenty visible on a suburban street but might feel dim in a heavily wooded setting. Look up lumen specs, don’t rely on marketing language like “super bright.” Modern outdoor home lighting standards range from 30 lumens (subtle accent) to 800+ (security-grade brightness).
Spacing matters too. Path lights spaced 3–4 feet apart create a clean, connected line. Wider spacing (6–8 feet) feels sparser but still guides foot traffic. Spotlights and motion sensors need placement that covers your priority zones without creating dead dark spots.
Installation and Setup Tips for Optimal Performance
Most solar lights require no tools beyond what’s in your junk drawer. Before you stake anything, prep the site.
Clean the panel face. Even light dust or pollen film reduces charging efficiency. Wipe panels with a dry cloth monthly, and after storms wash them with a gentle spray from the hose.
Position panels correctly. Many solar lights have detachable or rotatable panels. Orient them to face true south (in the Northern Hemisphere) for peak sun exposure throughout the day. Don’t aim them at a building or tree that casts afternoon shade, you need unobstructed light from roughly 9 a.m. to 3 p.m. for a solid charge.
Check ground conditions. Soft, recently tilled soil is easier to stake into. Hard, compacted earth or clay may require a rubber mallet and gentle taps, no amount of forcing prevents damage. If the ground is unyielding, a hand auger (a simple handheld drilling tool) makes quick work of hard soil. Alternatively, stake lights near the edge of a planting bed or along the patio perimeter where soil tends to be looser.
Activate correctly. Most solar lights ship with an ON/OFF switch hidden under a plastic tab on the battery compartment. Flip it to ON and set the unit in sunlight to charge for a full day before expecting peak nighttime brightness. Rushing this step is a common mistake, a partially charged battery runs dim all night, making owners think the light is defective.
For motion-sensor models, read the setup instructions, some require a 10–15 second hold on the power button to enter pairing mode, and a few step through sensitivity adjustments using a magnet or touchpoint. Getting this right prevents false triggers from nearby traffic or wind-blown plants.
Spacing and layering. Combine multiple fixture types for balanced lighting. Use landscape lighting kits as a starting point, then add specialty pieces where needed. A kit typically includes a mix of path lights: supplement with a couple of motion sensors near doors or the driveway.
Maximizing Battery Life and Runtime
Battery capacity (measured in mAh, milliamp-hours) and the efficiency of the light’s LED determine how long a charge lasts. A 600-mAh path light with a 0.5W LED might run 10–12 hours: a 2000-mAh floodlight with a 5W LED might manage 8–10 hours depending on brightness mode.
Choose the right light for your timeline. If you need illumination from dusk (say, 7 p.m.) to midnight, a mid-range fixture (800–1200 mAh) is plenty. If you’re lighting until dawn (7 p.m. to 6 a.m.), you need either a higher-capacity battery or a dimmer light. Some premium models offer dusk-to-dawn runtime with smart dimming, they run at full brightness for the first few hours, then throttle down by 50% late night when fewer people are moving around.
Seasonal reality check. Winter daylight is shorter and the sun angle is lower, so expect 30–50% less charging time in northern climates. A light that runs 12 hours in July may only manage 6–8 hours in January. Plan layout and fixtures with your worst-case season in mind.
Battery replacement. Quality solar lights use standard rechargeable AA or AAA NiMH batteries that you can swap out in 2–3 years when they start holding less charge. Budget $10–20 for a replacement set. Cheap lights use glued-in, non-replaceable cells, walk past those.
Keep panels clean. A dust-caked panel loses 10–20% of charging efficiency. Wipe them quarterly or after dusty weather. Rain helps, but dust and pollen buildup over months still requires a quick hand-wash with a soft cloth and plain water.
Research from Popular Mechanics and reviews on consumer sites confirm that mid-to-premium tier solar lights (typically $15–40 per fixture) deliver reliable, all-night runtime and withstand a few seasons of weather. Budget models under $10 often disappoint on brightness or lifespan.
For extra runtime security, consider adding a second charge cycle. Place lights in a sunny window indoors for a few hours on cloudy days to top up the battery before dark. It’s not a permanent fix for a poorly sited light, but it buys you an extra hour or two when needed.
Conclusion
Solar outdoor lights eliminate the expense, permitting hassle, and upkeep of hardwired landscape lighting while delivering the brightness and reliability you need. The key is matching the right fixture to your space, installing it in adequate sun, and keeping panels clean. Start with a mixed approach, a foundation of path lights, a couple of motion-sensor models for security, and perhaps a spotlight for accent. You’ll have genuine, functional outdoor illumination that costs nothing to run. After your initial investment, you’re done. No electrician callbacks, no utility bills, no regrets.


