
Poor kitchen lighting turns meal prep into guesswork and casts shadows exactly where you need to see. Under cabinet lights solve that problem, but only if they’re placed correctly. Mount them an inch too far forward, and you’ll see glare bouncing off your countertop. Set them too far back, and you’re still working in your own shadow. This guide walks through the exact placement measurements, spacing rules, and installation techniques that separate well-lit counters from dimly lit disappointments. Whether you’re retrofitting existing cabinets or planning a new kitchen, proper placement makes the difference between functional task lighting and wasted fixtures.
Table of Contents
ToggleKey Takeaways
- Under cabinet light placement at 2-3 inches from the front edge delivers optimal task lighting while keeping fixtures hidden from view and eliminating glare on countertops.
- Proper spacing of puck lights at 8-12 inches apart and mounting fixtures as high as possible within cabinet recesses ensures even illumination across your work surface.
- LED strip lights provide the most seamless coverage for long cabinet runs, while puck lights and linear bars suit kitchens with varied cabinet lengths and multiple work zones.
- Under cabinet lighting placement directly impacts energy efficiency—correct positioning eliminates the need for higher-wattage fixtures or unnecessary additional units.
- Match color temperature (2700-3000K for warm white or 3500-4000K for neutral white) to existing kitchen lighting and always test spacing with temporary mounting before final hardwired installation.
- Avoid common mistakes like centering lights under each cabinet, running wiring through cabinet interiors without proper conduit, and installing fixtures too close to sink faucets that block light distribution.
Why Proper Under Cabinet Light Placement Matters
Under cabinet lighting serves one primary purpose: eliminating shadows on work surfaces. When someone stands at the counter, their body blocks overhead light and creates a shadow zone exactly where they’re chopping, measuring, or reading recipes. Poorly placed under cabinet lights fail to correct this problem and can actually make it worse.
Task lighting performance depends on positioning. Fixtures mounted too close to the front edge create glare on polished countertops and shine directly into eyes when viewed from certain angles. Lights placed too far back cast shadows from items stored against the backsplash and leave the front portion of the counter dim.
Energy efficiency suffers with bad placement, too. Homeowners often compensate for poorly positioned lights by installing higher-wattage fixtures or adding more units than necessary. Correct placement delivers better illumination with less power consumption.
The difference shows up in daily use. Properly placed lights let you see true colors when cooking (critical for judging doneness), reduce eye strain during detailed tasks, and eliminate the need to lean awkwardly to avoid your own shadow. They also enhance the appearance of backsplash materials and highlight decorative elements without creating hot spots or dark bands.
Optimal Positioning: Where to Place Under Cabinet Lights
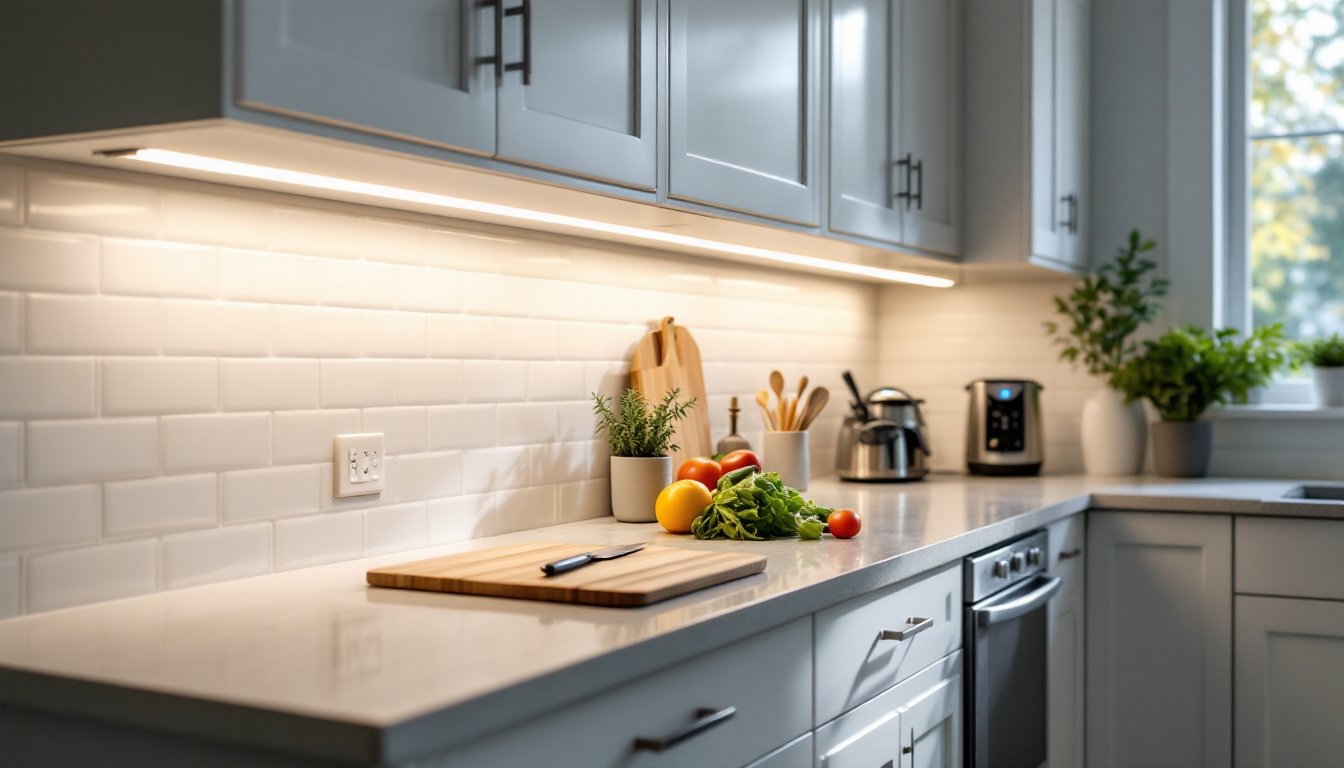
The sweet spot for under cabinet lights sits 2-3 inches from the front edge of the cabinet. This position directs light downward onto the counter surface while keeping the fixture concealed from normal sight lines. Someone standing at the counter won’t see the light source, and those sitting at a kitchen island or entering the room won’t catch glare.
Mount fixtures as high as possible within the cabinet recess, typically flush against the cabinet bottom or mounting surface. This maximizes the spread of light across the counter depth and minimizes shadows from appliances, canisters, or other items on the countertop.
Vertical clearance matters for accessibility. Leave at least 18 inches between the counter surface and the bottom of the light fixture. Most wall cabinets hang 18-20 inches above counters anyway, but if you’re dealing with custom or unusually low cabinets, check this measurement. Anything closer than 16 inches creates awkward working conditions and potential contact with hot pans or tall appliances.
For cabinets with decorative trim or molding that extends below the cabinet box, mount lights behind and above the trim piece rather than below it. This keeps the fixture hidden while maintaining optimal light distribution.
Front vs. Back Placement
Front mounting (2-3 inches from the front edge) provides the best task lighting for most kitchens. It illuminates the full depth of standard 24-inch countertops without creating glare. The fixtures remain hidden by the cabinet’s face frame or bottom edge when viewed from typical angles.
Back mounting (against the wall or backsplash) works only in specific situations: when you want to create ambient uplighting that highlights a tile or stone backsplash, or when cabinets are unusually shallow (15 inches deep or less). This position does not provide adequate task lighting for countertop work. The front half of the counter receives minimal illumination, and items placed near the backsplash block most of the useful light.
Some installers use strategic lighting placement to layer both front-mounted task lights and back-mounted accent lights. This setup requires separate switches or dimming controls to adjust for different uses, full brightness for food prep, dimmed accent lighting for entertaining.
Spacing Guidelines for Even Illumination
LED strip lights provide continuous illumination and eliminate spacing concerns. Install them in unbroken runs across the entire length of each cabinet section. For cabinets separated by a range hood or open shelving, run separate strips for each section rather than trying to bridge gaps.
Puck lights require calculated spacing to avoid bright spots and dark zones. The general rule: space puck lights 8-12 inches apart for even coverage. The exact distance depends on the fixture’s beam angle and output:
- Wide-beam pucks (120° spread): space 10-12 inches apart
- Narrow-beam pucks (60-90° spread): space 8-10 inches apart
- High-output fixtures (300+ lumens): space toward the wider end of the range
- Lower-output fixtures (150-250 lumens): space closer together
Start by placing one light centered under each cabinet door or drawer front, then fill gaps as needed. Avoid placing lights directly over sink edges or cooktop corners where cabinets end, this creates harsh light falloff at the boundaries.
Linear bar lights work like segmented strip lights. For cabinets 24-36 inches wide, one centered bar usually suffices. Wider cabinets (48 inches or more) need two bars spaced evenly across the length. Leave 2-3 inches from the end of the cabinet to the end of the light bar to prevent light spill off the counter edge.
Measure actual cabinet interior width, not the face frame width. A “36-inch cabinet” typically has a 33-inch interior span once you account for the frame and door overlay. Size your lights and spacing to the usable interior dimension.
Test spacing before final installation. Temporary mounting with double-sided tape or clamps lets you evaluate coverage and adjust positions. Run the lights in a darkened kitchen to spot any dark patches or overly bright zones. This step prevents having to relocate hardwired fixtures after drywall patching and painting.
Common Placement Mistakes to Avoid
Centering lights under each cabinet sounds logical but often creates uneven lighting. Cabinet widths vary, and centered placement can leave end sections dim while middle areas are overly bright. Instead, establish a consistent spacing pattern across all cabinets based on the guidelines above.
Installing lights over the sink without considering the faucet creates problems. Tall faucets with pull-down sprayers block light when positioned between the fixture and work area. Either move lights to flank the sink area or mount them far enough back to clear the faucet arc.
Ignoring cabinet depth variations leads to inconsistent results. Some kitchens mix standard 12-inch deep uppers with 24-inch deep base cabinets topped with shallow uppers. Treat each cabinet depth separately, shallower cabinets may need lights mounted closer to the back edge to avoid glare.
Running wiring through cabinet interiors seems easier than drilling through walls, but it creates fire code issues. Cables running inside cabinets can contact stored items, create heat buildup, and violate National Electrical Code (NEC) requirements for wiring protection. Route power cables through walls or along cabinet backs in approved conduit or cable channels.
Forgetting about switches until after installation frustrates daily use. A well-planned lighting layout includes accessible switching. Place switches at the entry point to the kitchen or near primary work zones. Three-way switches make sense for kitchens with multiple entry points.
Using mismatched color temperatures creates a patchwork appearance. If you’re adding under cabinet lights to a kitchen with existing lighting, match the color temperature (measured in Kelvin). Most kitchens use 2700-3000K (warm white) or 3500-4000K (neutral white). Installing 5000K (daylight) under cabinet lights in a kitchen with 2700K overhead lighting looks jarring. The fixtures may illuminate well individually but clash when used together.
Installation Tips for Different Cabinet Types
Face-frame cabinets (traditional style with a wooden frame) provide a built-in mounting surface. Position fixtures against the cabinet bottom, behind the front face rail. The rail conceals the light source while the frame provides solid wood for screw attachment. Predrill screw holes to prevent splitting, especially near frame corners.
Frameless cabinets (European-style) require different tactics. The cabinet bottom is typically ½-inch or ¾-inch particleboard or plywood. Use appropriate hollow-core anchors if screwing into particleboard, or drive screws into solid wood mounting strips if the manufacturer included them. Some frameless cabinets have a front edge band that serves as a mounting surface for clips or brackets.
Cabinets with integrated LED channels built into the cabinet bottom simplify installation. These systems include routed channels or aluminum extrusions designed for specific LED strip profiles. Snap strips into the channel according to the manufacturer’s instructions. If retrofitting these systems, verify that replacement strips match the original profile, LED strips aren’t universally compatible.
Metal cabinets (common in modern and commercial-style kitchens) limit mechanical attachment options. Magnetic mounting brackets work for steel cabinets. For aluminum or stainless steel, use heavy-duty construction adhesive rated for metal-to-plastic bonding, or drill and tap threads for machine screws. Avoid self-tapping screws in thin-gauge stainless, they strip easily.
Cabinets with thick crown molding or deep decorative rail require creative solutions. The molding may extend 2-3 inches below the cabinet box, pushing lights too far from the mounting surface. Options include mounting to the rear of the molding (sacrificing ideal placement), building out a wooden mounting strip to bring fixtures forward, or recessing lights into the molding itself with a router and suitable bit.
Safety note: Under cabinet lights connected to household power (hardwired 120V) require proper electrical boxes and wiring methods per NEC standards. Most jurisdictions require electrical permits for adding new circuits. Low-voltage LED systems (12V or 24V) offer DIY-friendly alternatives, they’re safer to work with and often plug into standard outlets, though longer runs may need thicker wire to prevent voltage drop and dimming at the far end.
Choosing the Right Lighting Type for Your Layout
LED strip lights suit long, continuous cabinet runs. They’re flexible (literally), easy to cut to length at marked intervals, and provide seamless illumination without visible gaps. Look for high-density strips (120-180 LEDs per meter) for the most even light distribution. Low-density strips (30-60 LEDs per meter) work for accent lighting but create noticeable light and dark bands for task lighting. Installation requires a power supply sized to the total strip length, calculate wattage per foot multiplied by total run length, then add 20% overhead.
Puck lights offer focused pools of light and straightforward installation. Battery-powered versions avoid wiring entirely but require frequent battery changes (every 3-6 months depending on use). Plug-in pucks work well for rentals or retrofit situations where running new wire isn’t practical. Space and aim carefully, puck lights create distinct light circles that overlap to provide coverage, and poor placement shows immediately.
Linear bar lights balance the coverage of strips with the simplicity of puck installation. They’re rigid fixtures that mount like traditional flush mount fixtures, available in fixed lengths (6, 12, 18, 24 inches). They work well for kitchens with many short cabinet sections separated by windows, appliances, or open shelving. Most connect via linking cables, allowing one power supply to run multiple bars.
Tape light vs. rigid strips: Flexible tape light bends around corners and adjusts to uneven mounting surfaces but offers less protection from dust and moisture. Rigid aluminum-channel strips cost more but include diffusers that soften light output and protect the LEDs. For kitchens with heavy cooking and grease buildup, rigid strips with removable covers simplify cleaning.
Color temperature affects how your kitchen looks and functions. Warm white (2700-3000K) creates a cozy, traditional feel and flatters wood tones and warm-colored countertops. Neutral white (3500-4000K) provides accurate color rendering for food prep and works with most design schemes. Cool white or daylight (5000K+) looks clinical in most kitchens but suits ultra-modern designs with stainless steel and white surfaces.
Dimming capability adds flexibility. Many LED fixtures support dimming, but the dimmer switch must be LED-compatible, standard incandescent dimmers cause flickering or buzzing. Verify compatibility before purchase. Dimming lets you dial task lighting up for cooking and down for ambient lighting during dinner or entertaining.
Match the lighting type to your cabinet layout, your DIY skill level, and your tolerance for visible fixtures. Strips disappear along cabinet bottoms, pucks make distinct statements (visible or not depending on placement), and bars split the difference. Most successful kitchen lighting combines under cabinet lights with other kitchen lighting strategies to create layered illumination for different tasks and times of day.


