
Track lighting has come a long way from those clunky commercial fixtures of the ’80s. Today’s systems deliver flexibility, style, and smart illumination, perfect for living rooms that need to do it all. Whether someone’s highlighting art, banishing shadowy corners, or just avoiding the hassle of hardwiring multiple fixtures, track lighting offers a practical solution that looks good doing it. This guide walks through everything from selecting the right system to installing it without hiring an electrician.
Table of Contents
ToggleKey Takeaways
- Track lighting for living rooms offers flexibility to reposition fixtures and adjust beam direction as needs change, unlike recessed lighting that stays fixed once installed.
- Modern track lighting systems integrate LED technology that lasts 25,000–50,000 hours and uses 75% less energy than halogen equivalents, delivering energy efficiency with superior light quality.
- Successful track lighting installation requires planning zones (artwork, reading areas, shelves), positioning tracks 12–24 inches from walls at proper angles, and calculating head count at one per 4–6 feet of track.
- Most DIY homeowners can install track lighting in an afternoon by connecting to an existing ceiling junction box, securing the track every 2–3 feet with proper anchors, and grounding all metal components per electrical code.
- Track lighting serves as a design tool beyond function, creating dramatic effects through gallery wall spotlighting, wall washing textured surfaces, and layering with ambient fixtures using warm 2700K color temperature for inviting living spaces.
- LED track heads must be verified as dimmable and paired with LED-compatible dimmer switches to avoid flickering and ensure smooth mood adjustment in living rooms.
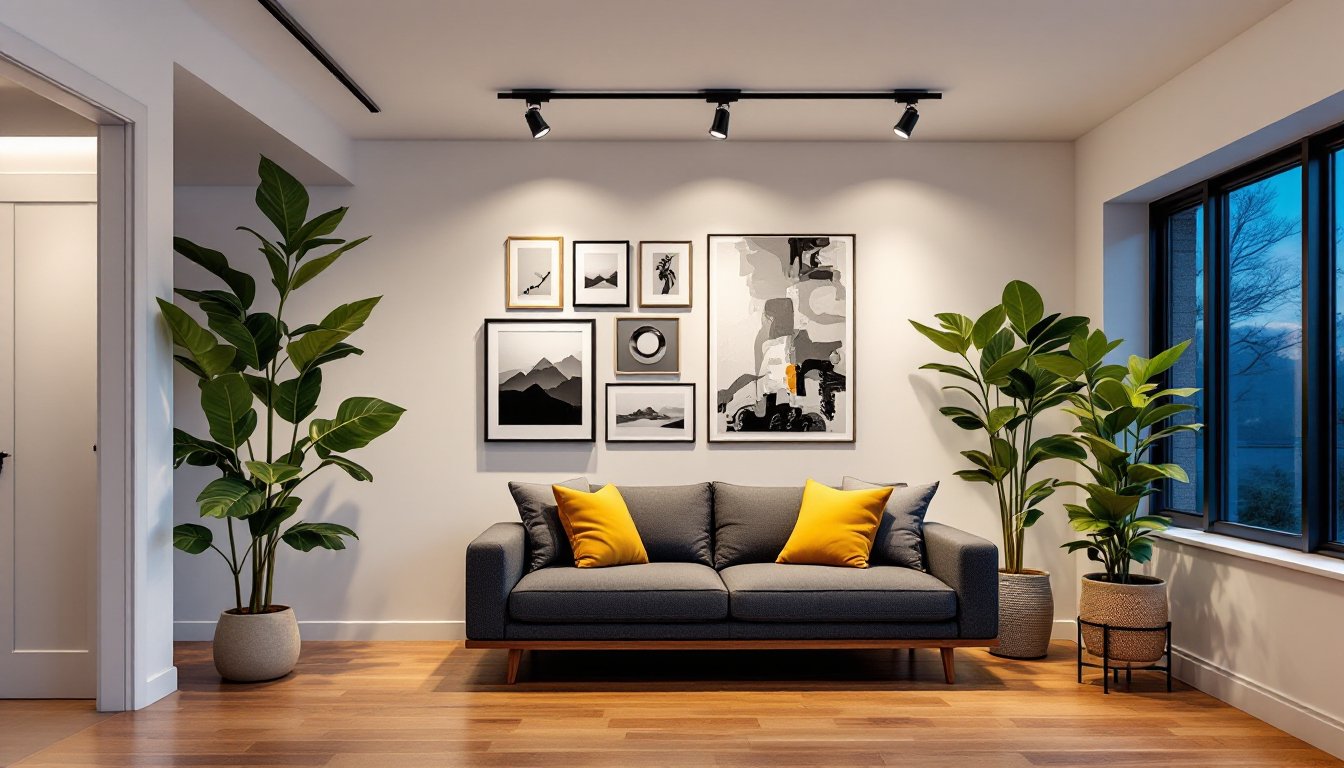
Why Track Lighting Works Beautifully in Living Rooms
Living rooms demand versatility. They’re reading nooks at 7 a.m., movie theaters by 8 p.m., and game night headquarters on weekends. Track lighting handles all these roles because each fixture (called a head or luminaire) can be repositioned, angled, and sometimes dimmed independently.
Unlike recessed cans, which stay put once installed, track systems let homeowners adjust beam direction as furniture moves or needs change. Highlighting a gallery wall today? Aim three heads at the artwork. Rearranging next month? Just twist the heads.
Track lighting also solves wiring headaches in older homes. Instead of cutting multiple ceiling holes for recessed fixtures, one electrical box powers the entire track. That means less drywall repair and faster installation. For rooms with vaulted or cathedral ceilings, tracks can be mounted to sloped surfaces where recessed lighting would require special housing. Many homeowners find that outdoor track solutions inspire creative indoor applications, especially for highlighting architectural features.
Finally, modern track systems integrate with LED technology, delivering energy efficiency without sacrificing light quality. Most LED track heads last 25,000–50,000 hours and use 75% less energy than halogen equivalents.
Choosing the Right Track Lighting Style for Your Space
Track lighting isn’t one-size-fits-all. The system someone chooses should complement their room’s aesthetic while meeting functional needs. Here’s how to narrow it down.
Modern and Minimalist Track Systems
Monorail and cable systems dominate contemporary spaces. Monorail tracks are low-profile, often less than an inch wide, and curve around corners or architectural features. Cable systems stretch aircraft-grade stainless steel cables between walls or ceiling mounts, suspending heads along the wire.
These systems work best in rooms with clean lines, neutral palettes, and statement furniture. The hardware nearly disappears, letting the light do the talking. Heads come in finishes like brushed nickel, matte black, or polished chrome. Look for gimbal-style heads (the type that swivel 360° and tilt 90°) for maximum directional control.
LED options dominate modern tracks. Integrated LED heads can’t have bulbs replaced, but they last decades. Replaceable LED systems use standard GU10 or MR16 sockets, offering flexibility if color temperature preferences change. When thoughtfully integrated with broader living room design principles, modern track systems become sculptural elements.
Traditional and Transitional Options
H-style and J-style tracks suit classic or transitional living rooms. These are the workhorse systems: affordable, widely compatible, and available at every home center. The track itself is more prominent (usually 1–1.5 inches wide), but decorative heads can soften the industrial look.
Choose heads with glass shades, Edison-style bulbs, or vintage finishes like oil-rubbed bronze or antique brass. Some manufacturers offer track pendants, hanging fixtures that clip into the track, to add visual interest and layer light at different heights.
These systems use either line-voltage (120V) or low-voltage (12V via a transformer). Line-voltage is simpler for DIY installation: low-voltage offers more compact heads and crisper beam control. According to design experts at HGTV, mixing ambient and accent lighting creates depth in traditional spaces, and track systems excel at both.
How to Plan Your Track Lighting Layout
Good track lighting starts with a plan, not a drill. Here’s how to map it out.
Step 1: Identify what needs light. Walk the room and note specific zones: the sofa for reading, artwork on the accent wall, a bookshelf in the corner. Track lighting is about accent and task lighting, not flooding the entire ceiling with fixtures.
Step 2: Choose track placement. Tracks typically run parallel to the longest wall, about 12–24 inches from the wall itself. This keeps light angled toward vertical surfaces without creating harsh shadows. For artwork, position the track so heads aim at a 30° angle to the wall, this minimizes glare and evenly illuminates the piece.
Rooms with vaulted ceilings may need tracks mounted on slope ceiling adapters or along a beam. Measure the ceiling pitch (rise over run) to ensure heads can tilt low enough to aim at intended targets.
Step 3: Calculate head count and spacing. A common guideline: one head per 4–6 feet of track. For ambient lighting, space heads evenly. For accent lighting, cluster them where needed. Don’t exceed the track’s maximum wattage (usually listed on the packaging), add up all bulb wattages to stay under the limit.
Step 4: Locate the electrical box. Most tracks connect to a standard ceiling box. If the existing box isn’t centered where the track should go, use a floating canopy (a cover plate that offsets the track from the box by up to 2 feet). If there’s no box, hire an electrician, track lighting requires a proper junction box per NEC code.
Sketch the layout on graph paper or use a lighting layout tool to visualize spacing before buying materials.
Installation Tips for DIY Track Lighting Projects
Most homeowners with basic electrical know-how can install track lighting in an afternoon. Here’s the step-by-step.
Safety first: Turn off power at the breaker, not just the wall switch. Use a non-contact voltage tester to confirm the ceiling box is dead before touching any wires.
Tools and materials needed:
- Track lighting kit (track, heads, connectors, mounting hardware)
- Screwdriver or drill with bits
- Wire strippers
- Wire nuts (usually included)
- Ladder or step stool
- Safety glasses
- Voltage tester
Installation steps:
-
Mount the canopy or power feed. Attach the mounting bracket to the ceiling box. Connect black (hot) to black, white (neutral) to white, and green or bare copper (ground) to the ground screw or wire. Secure with wire nuts and tuck wires into the box. Fasten the canopy.
-
Attach the track. Snap or twist-lock the track into the power feed. Most tracks come in 4-foot or 8-foot sections. Secure the track to the ceiling every 2–3 feet using the provided toggles or screws. If mounting to drywall without a joist, use toggle bolts rated for at least 50 pounds to prevent sagging.
-
Add connectors if needed. L-connectors, T-connectors, or flexible joints let tracks turn corners. Make sure power flows through each section (some connectors are dead-end caps).
-
Install the heads. Twist or clip each head into the track. Most systems have a tab or lever that locks the head in place. Angle heads toward target areas.
-
Restore power and test. Flip the breaker back on. If heads don’t light, double-check connections at the power feed and confirm bulbs are seated properly.
Common mistakes to avoid:
- Overloading the circuit. If the living room already has multiple outlets and fixtures on one 15-amp breaker, adding high-wattage track lighting may trip it. Check the breaker panel and calculate total load.
- Skipping the ground wire. Metal tracks must be grounded per code. Never bypass the ground connection.
- Mounting to drywall alone. Tracks are heavier than they look. Always hit a ceiling joist or use proper anchors.
If the project involves adding a new circuit, moving a junction box, or working in a room without existing overhead wiring, hire a licensed electrician. Permits are typically required for new circuits in most jurisdictions. For more complex lighting solutions, consulting a pro ensures compliance with local electrical codes.
Creative Ways to Use Track Lighting in Your Living Room
Track lighting isn’t just functional, it’s a design tool. Here are five ways to make it shine.
1. Gallery wall spotlighting. Aim heads directly at framed art, photos, or mirrors. Use narrow beam bulbs (15–25° spread) for focused light that makes artwork pop. Adjust spacing so each piece gets even coverage without hot spots. Browsing inspiration on sites like Houzz’s track lighting gallery can spark layout ideas.
2. Accent architectural features. Graze light across textured walls (brick, stone, shiplap) to create drama. Position the track close to the wall and aim heads at a steep angle. This technique, called wall washing, highlights texture and adds depth.
3. Layer with other fixtures. Track lighting works best as part of a layered scheme. Pair it with a central chandelier or pendant for ambient light, then use track heads for task and accent lighting. Dimmer switches on both circuits let users dial in the perfect mood.
4. Illuminate bookshelves or built-ins. Angle heads into open shelving to light collectibles, books, or plants. This draws the eye and makes the room feel curated. If shelves are deep, consider wall-mounted tracks on the front edge rather than ceiling-mounted ones.
5. Create zones in open-concept spaces. Use track lighting to define the living area in a great room. Run a track along the seating zone, aiming heads down to create a visual boundary without walls. This works especially well when coordinating with decorative lighting elements like floor lamps or sconces.
Bulb selection matters. Color temperature affects mood. 2700K (warm white) feels cozy and inviting, ideal for living rooms. 3000K (soft white) is slightly crisper, good for reading nooks. Avoid anything above 3500K, which skews too clinical for residential spaces. CRI (Color Rendering Index) should be 90 or higher to accurately show paint colors and artwork.
Dimming compatibility. Not all LED track heads dim smoothly. Check packaging for “dimmable” labels and pair with an LED-compatible dimmer switch to avoid flickering. The Spruce notes that mismatched dimmers and LEDs are a top DIY complaint, worth the extra five minutes to verify compatibility.
Track lighting flexes to fit nearly any living room style or function. With the right planning, installation care, and creative aiming, it transforms flat, uninspiring spaces into dynamic, well-lit rooms that actually get used.


