
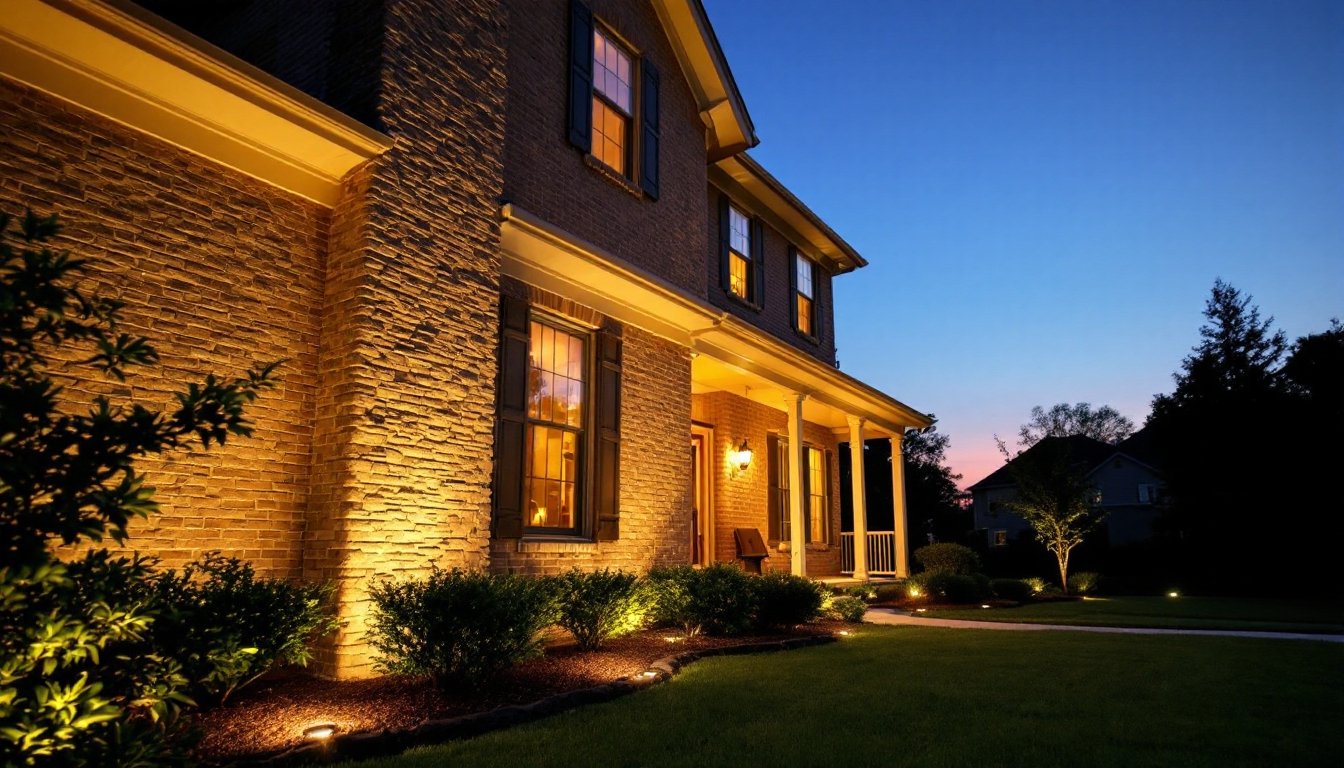
Wall wash lighting can turn a flat, forgettable exterior wall into a dramatic focal point after dark. Unlike spotlights that create harsh circles or floodlights that blast everything evenly, wall washing creates a smooth, even gradient of light that travels up or down a vertical surface. It’s a technique used by landscape designers and architects to emphasize texture, highlight stonework, and add dimension to facades. With LED technology now delivering better color rendering and longer lifespans than ever, outdoor wall wash lighting has become a practical and affordable upgrade for most homeowners willing to dig a shallow trench and work with low-voltage wiring.
Table of Contents
ToggleKey Takeaways
- Outdoor wall wash lighting creates a smooth, even gradient of light that emphasizes texture and adds dramatic curb appeal without permanent changes to your home’s exterior.
- LED fixtures are superior to halogen for residential wall washing, offering 25,000–50,000 hour lifespans, consistent color rendering, and operating costs under $2 per year compared to $13 for older halogen systems.
- Proper fixture placement requires measuring wall height, considering beam angles (60°–120° for short walls, 30°–45° for tall walls), and spacing fixtures every 5–7 feet for even coverage without hot spots.
- Choose waterproof fixtures rated IP65 or higher, position in-ground uplights 6–18 inches from the wall, and use die-cast aluminum or stainless steel materials to resist corrosion in outdoor conditions.
- Low-voltage 12V systems are safer and easier for DIY installation than line voltage, but require proper cable sizing (12 AWG for runs up to 50 feet, 10 AWG for 100+ feet) to prevent voltage drop and dimming.
- Test your outdoor wall wash lighting system at dusk before burying cable to adjust angles, eliminate hot spots, and ensure even illumination across textured surfaces like brick, stone, or stucco.
What Is Outdoor Wall Wash Lighting?
Wall wash lighting uses fixtures positioned close to a vertical surface, typically 6 to 18 inches away, to cast light evenly across the wall from bottom to top or top to bottom. The beam angle and distance determine the coverage: wider beams (60° to 120°) work for short walls or textured surfaces like stucco and stone, while narrower beams suit taller, smoother facades.
The effect is subtle and architectural. Instead of seeing the light source itself, viewers notice the illuminated surface. That’s the point. Wall washing reveals texture, brick mortar lines, wood grain, stacked stone, by creating gentle shadows that shift depending on the fixture’s angle.
Most outdoor wall wash fixtures fall into two categories: in-ground uplights (also called well lights) and surface-mounted downlights. Uplights sit flush with the ground or hardscape and shine upward. Downlights mount under eaves, soffits, or fascia boards and aim downward. Both work, but uplights tend to produce more drama, while downlights feel more controlled and less theatrical.
You’ll also see the term “grazing” used interchangeably with wall washing. Technically, grazing means placing the fixture even closer, often 3 to 6 inches, to exaggerate texture and shadow. Wall washing is softer and more forgiving. If the surface has imperfections (patched stucco, uneven siding), stick with wall washing and increase the distance slightly to minimize shadows.
Benefits of Installing Wall Wash Lighting Outdoors
First, it adds curb appeal without permanent changes. Unlike paint or new siding, lighting is reversible. A dozen well-placed uplights can redefine a home’s nighttime appearance for a fraction of what re-cladding costs. Real estate agents consistently note that homes with quality landscape lighting photograph better and feel more finished during evening showings.
Security is another practical benefit. Wall washing doesn’t create harsh glare or dark pockets where someone could hide. Instead, it provides even, ambient light that defines boundaries and makes movement more visible. When integrated with smart home technology, timers and motion sensors can activate fixtures on a schedule or in response to activity.
Wall washing also extends usable outdoor space. A well-lit patio wall becomes a backdrop for gatherings, and illuminated architecture anchors the yard visually after dark. Combined with other outdoor fixtures, wall wash lighting creates layers, low path lights, mid-height accent lighting, and vertical washes, that make outdoor areas feel intentional and designed.
Finally, modern LED wall wash fixtures use minimal energy. A typical 3-watt LED uplight running 6 hours per night costs less than $2 per year in electricity. Compare that to older 20-watt halogen fixtures, which cost closer to $13 annually and require bulb replacements every 2,000 hours. The return on investment shows up quickly, especially in climates where outdoor lighting runs year-round.
Choosing the Right Wall Wash Fixtures for Your Space
Start by measuring the wall height and noting the surface material. A single-story wall (8 to 10 feet) typically needs fixtures with a 60° to 90° beam spread placed 12 to 18 inches from the base. For two-story walls (16 to 20 feet), look for narrow beam fixtures (30° to 45°) with higher lumen output, around 400 to 600 lumens per fixture, and space them closer together for even coverage.
Texture matters. Smooth surfaces like painted wood or vinyl siding show every imperfection if the light grazes too closely. Position fixtures farther out and use a wider beam. Rough surfaces, stone, brick, board-and-batten, benefit from closer placement and tighter beams to bring out shadow detail.
Color temperature affects mood. 3000K (warm white) is the most common choice for residential exteriors: it complements wood tones, brick, and warm-painted finishes without looking sterile. 2700K mimics incandescent bulbs and works well with traditional or rustic homes. 4000K (neutral white) suits modern architecture and gray or white facades but can feel clinical if overused.
Waterproofing is non-negotiable. Look for fixtures rated IP65 or higher. IP65 means dust-tight and protected against water jets from any direction, enough to handle sprinklers, rain, and snow. In-ground fixtures should be IP67 (submersion-resistant) if they’re near grade where water can pool. Materials like die-cast aluminum or marine-grade stainless steel resist corrosion better than plastic, especially in coastal or high-humidity climates.
LED vs. Halogen: Which Light Source Works Best?
LEDs dominate the market now, and for good reason. They last 25,000 to 50,000 hours, run cool, and deliver consistent color over their lifespan. A quality LED fixture won’t shift from warm white to blue or yellow after a few thousand hours. They also work seamlessly with dimmers and smart controllers.
Halogen fixtures are nearly obsolete in residential landscape lighting, but some pros still use them for high-output applications or when precise color rendering matters (like illuminating a mural or sculpture). Halogens produce more lumens per watt than incandescent but far less than LEDs. They also generate significant heat, which can scorch plants, melt snow buildup in fixture housings, and shorten transformer life.
If you’re replacing an old halogen system, you can often retrofit with LED bulbs (MR16 or GU10 bases) without rewiring, but check the transformer’s compatibility. Older magnetic transformers may not play well with low-wattage LEDs and can cause flickering or early failure. Upgrading to an electronic transformer solves that and future-proofs the system.
Best Placement Strategies for Maximum Impact
Start by identifying the wall’s focal points: a stone chimney, board-and-batten siding, a textured feature wall, or an accent color. Wall washing works best when it highlights something worth seeing. Avoid washing blank, featureless walls unless they anchor the yard or define an entertainment area.
Spacing between fixtures depends on beam angle and wall height. As a rough guideline, divide the wall height by two to get the spacing interval. For a 10-foot wall, place fixtures every 5 feet along the base. Narrower beams require closer spacing: wider beams let you stretch to 6 or 7 feet. Test before trenching, set fixtures on the ground at dusk, power them up, and adjust until the wash looks even with no hot spots or dark gaps.
Avoid placing fixtures directly below windows unless you want curtains and interior clutter visible from the yard. Shift them to either side or lower the beam angle so light travels horizontally instead of straight up. If the wall includes downspouts, tuck fixtures just to one side rather than directly in front where shadows will interrupt the wash.
Corners need special attention. A single fixture aimed at a corner will create a bright triangle and leave the adjacent wall dark. Use two fixtures, one on each wall, angled toward the corner to create overlapping coverage. This technique, common in professional lighting design, ensures a seamless transition and keeps the corner from looking like a dead zone.
For homes with multiple materials, stone on the lower half, siding above, use separate fixture types or adjust beam angles. A wide-beam uplight can wash the stone, while a narrow downlight under the eave highlights the siding. Layering different fixture types adds depth and prevents the lighting from feeling one-note.
DIY Installation Tips for Homeowners
Most outdoor wall wash systems run on 12-volt low-voltage wiring, which is safer and easier to work with than line voltage (120V). You’ll still need a transformer, usually installed in a garage or under an eave, to step down household current. Size the transformer for 80% of its rated capacity, if the total wattage of your fixtures adds up to 120 watts, use a 150-watt transformer minimum.
Before digging, call 811 to mark underground utilities. Even low-voltage cable can short out or cause problems if it crosses a gas line or irrigation system. Plan the wire run to avoid root zones and high-traffic areas where soil compaction can damage cable over time.
Trench depth varies by jurisdiction, but 6 inches is typical for low-voltage landscape lighting in most areas. Use direct-burial cable rated for wet locations (UF-rated or equivalent). Standard lamp cord isn’t rated for underground use and will degrade within a year or two. Run cable in a straight line when possible and avoid sharp bends, which create voltage drop and can damage insulation.
Voltage drop is the most common DIY mistake. Wire loses voltage over distance, especially if it’s undersized. For runs up to 50 feet, use 12 AWG wire. For runs up to 100 feet, step up to 10 AWG. If fixtures at the end of the run are noticeably dimmer, you’ve got voltage drop. The fix is thicker wire or a second transformer zone.
When positioning in-ground fixtures, dig a hole slightly deeper than the fixture housing and backfill with pea gravel or coarse sand to aid drainage. Compacted clay around the fixture can trap water and lead to corrosion. Aim the fixture at the wall, tighten the stake or mount, then cover the hole with mulch or sod. For surface-mounted downlights, use stainless steel screws and seal the entry point with silicone caulk to prevent water intrusion.
Test the system before burying wire. Power everything on and walk the yard at dusk. Adjust fixture angles, check for hot spots, and make sure timers or photocells activate as expected. Once you’re satisfied, bury the cable, compact soil lightly, and mark the wire path with landscape flags or stakes so you don’t hit it with an edger or shovel later.
Safety note: Always wear gloves and safety glasses when digging and handling fixtures. Low-voltage systems are safer than line voltage, but transformers still connect to household current. If you’re uncomfortable working with electrical boxes or don’t have a GFCI-protected outlet for the transformer, hire a licensed electrician for that portion. Many planning tools can help visualize fixture placement before you start digging, saving time and reducing errors.
Conclusion
Outdoor wall wash lighting offers one of the most effective ways to add depth and drama to a home’s exterior without major construction or expense. With the right fixtures, careful placement, and attention to voltage and beam angles, homeowners can achieve results that rival professional installations. The key is taking time upfront to measure, test, and adjust before committing to buried cable. Following proven outdoor design principles and understanding the fundamentals of low-voltage systems will deliver years of reliable performance and curb appeal.


