
Installing the right outdoor ceiling lighting changes how homeowners use their exterior spaces after dark. A properly lit covered patio becomes a usable dining area. A dim porch transforms into a welcoming entryway. A dark deck suddenly hosts evening gatherings without fumbling for flashlights. The difference between functional outdoor lighting and mediocre fixtures comes down to choosing the right type, mounting it correctly, and matching the fixture to the space’s exposure and ceiling height. This guide walks through selecting, installing, and designing with outdoor ceiling lights that stand up to weather while delivering the illumination needed.
Table of Contents
ToggleKey Takeaways
- Outdoor ceiling lighting extends the usable hours of exterior spaces and improves home safety by eliminating trip hazards and removing shadows where intruders could approach undetected.
- Select the right outdoor ceiling light type—flush mount for low ceilings, semi-flush for added style, or pendants for zone-specific illumination—and match the UL rating (Wet or Damp) to your location’s exposure level.
- Calculate lighting needs using 10 to 20 lumens per square foot, choose warm white (2700K–3000K) for relaxation areas and cool white (4000K–5000K) for task-oriented zones, and layer multiple fixtures to eliminate harsh shadows.
- Proper installation requires turning off power at the breaker, using outdoor-rated electrical boxes with gaskets, applying silicone caulk around the ceiling box, and following local NEC codes—hire a licensed electrician for complex wiring work.
- LED bulbs are significantly more cost-effective than incandescent equivalents, consuming roughly one-third of the energy and lasting longer, making them the clear choice for outdoor ceiling fixtures running multiple hours nightly.
- Layer ceiling lights with wall sconces, string lights, and path lighting to create visual depth, and test fixture placement at night to verify light reaches activity areas without creating unwanted glare.
Why Outdoor Ceiling Lighting Matters for Your Home
Outdoor ceiling lights extend the usable hours of exterior living spaces. Without overhead illumination, covered patios and porches sit unused after sunset, wasting square footage that could host dinners, conversations, or quiet evenings with a book.
From a safety standpoint, ceiling-mounted fixtures eliminate trip hazards by lighting stairs, thresholds, and uneven decking. They also improve home security by removing shadows where intruders might approach undetected. Motion-activated ceiling lights mounted near entry doors provide hands-free illumination when carrying groceries or packages.
Properly rated outdoor fixtures withstand moisture, temperature swings, and UV exposure that would destroy indoor lights within months. The UL Wet rating indicates a fixture can handle direct rain exposure, while UL Damp ratings suit covered areas with high humidity but no direct water contact. Mismatching the rating to the location leads to corroded sockets, failed seals, and electrical hazards.
Ceiling lights also increase property value. Homes with well-lit outdoor living areas photograph better for listings and demonstrate functional outdoor space to buyers. According to experts at Bob Vila, exterior lighting ranks among the top improvements for curb appeal and nighttime home presentation.
Types of Outdoor Ceiling Lights to Consider
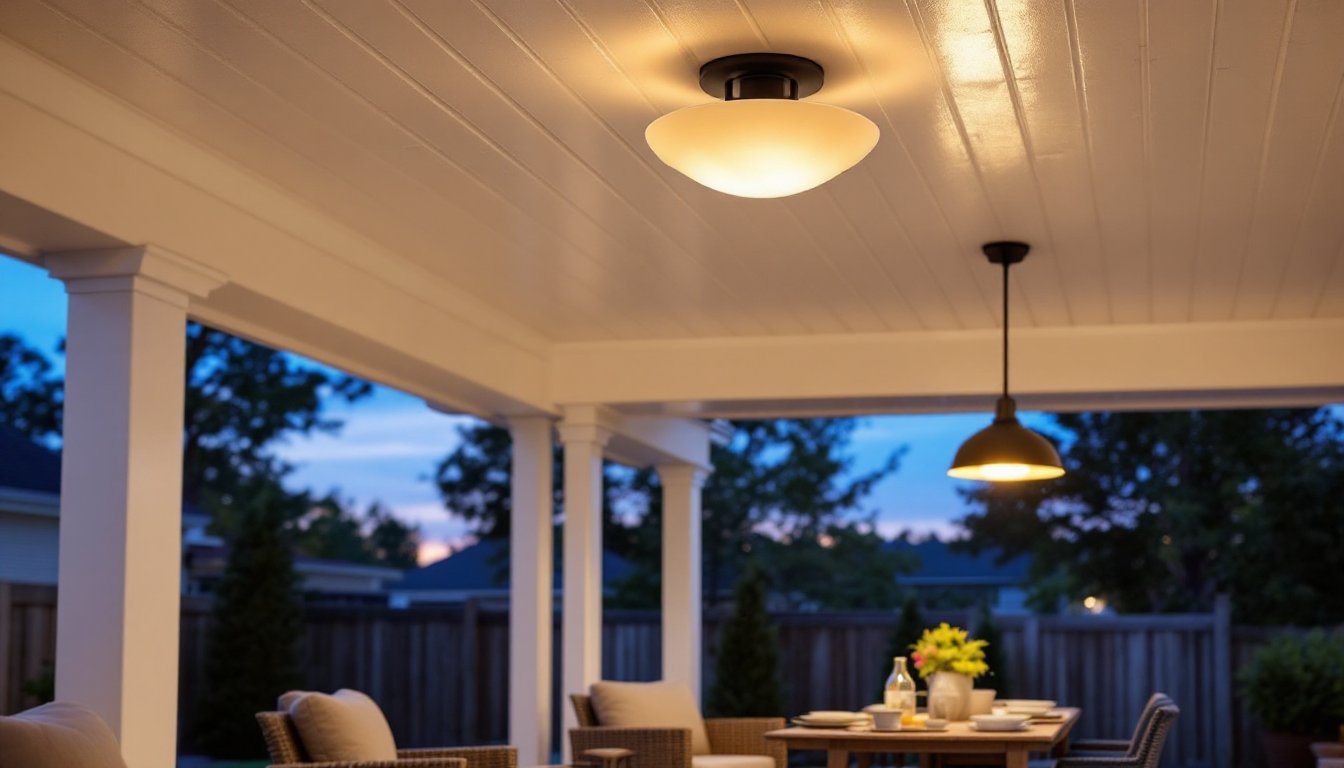
Flush Mount and Semi-Flush Fixtures
Flush mount fixtures sit tight against the ceiling with minimal or no gap, making them ideal for covered porches with 8-foot ceilings or lower. They provide widespread illumination without hanging into head space. Most use a single bulb ranging from 60 to 100 watts (incandescent equivalent), though LED versions now dominate with 800 to 1600 lumens at a fraction of the wattage.
Semi-flush fixtures drop 4 to 8 inches from the ceiling, offering slightly more decorative profile while maintaining clearance. They work well on covered patios where ceiling height isn’t restricted but direct rain exposure remains a concern. Look for models with frosted or seeded glass diffusers to reduce glare and distribute light evenly across seating areas.
Both styles mount to standard electrical boxes. Verify the box is rated for outdoor use and that it’s properly sealed where it penetrates the ceiling. Plastic outdoor-rated boxes work for lighter fixtures under 10 pounds, but metal boxes provide better support for heavier designs.
Pendant Lights and Chandeliers
Pendant lights hang from a chain, cord, or rod, typically dropping 12 to 36 inches below the ceiling. They concentrate light in a specific zone, making them effective over dining tables, outdoor bars, or conversation areas. Outdoor track lighting provides an alternative for adjustable directional coverage.
For homes embracing farmhouse aesthetics, lantern-style pendants with clear or seeded glass deliver both illumination and character. Multi-bulb chandeliers suit larger covered spaces with 10-foot or higher ceilings, though they require careful attention to wind resistance and secure mounting.
Pendants and chandeliers demand proper ceiling clearance. Maintain at least 7 feet from floor to the lowest point of the fixture to prevent head strikes. In high-wind areas, choose designs with enclosed bulbs rather than exposed candelabra styles that can rattle or break.
Mounting hardware varies by weight. Fixtures over 15 pounds need fan-rated electrical boxes secured directly to ceiling joists or blocking. Use the manufacturer’s recommended chain or rod length, and run the electrical wire through the center rather than alongside it for a clean appearance.
Choosing the Right Outdoor Ceiling Light for Your Space
Match fixture size to ceiling area using the room sizing formula: add the room’s length and width in feet, then convert to inches for the fixture diameter. For a 12 x 14-foot covered patio, that’s 26 inches, a good starting point for fixture selection. Adjust down for crowded spaces with furniture and up for open areas.
Consider lumens over wattage when comparing bulbs. A comfortable outdoor living space needs 10 to 20 lumens per square foot. That same 12 x 14 patio (168 square feet) requires roughly 1,700 to 3,400 lumens total. Divide that across multiple fixtures for even coverage rather than relying on a single high-output light.
Color temperature affects ambiance. Warm white bulbs (2700K to 3000K) create inviting spaces for relaxation and dining. Cool white (4000K to 5000K) suits task-oriented areas like outdoor kitchens or workshops. Avoid mixing temperatures in the same visual field, it reads as unintentional rather than designed.
For optimal lighting solutions, match the fixture finish to existing hardware. Oil-rubbed bronze complements traditional architecture and hides wear. Matte black suits modern farmhouse and contemporary styles. Powder-coated aluminum resists coastal corrosion better than painted steel.
Dimmable fixtures add versatility. Pair compatible LED bulbs with outdoor-rated dimmer switches to adjust from full task lighting to subtle ambient glow. Not all LED bulbs dim smoothly, check compatibility with your switch model to avoid flickering or buzzing.
Installation Tips for Outdoor Ceiling Lighting
Safety first: Turn off power at the breaker, not just the wall switch. Verify it’s off with a non-contact voltage tester before touching any wires. Outdoor electrical work is subject to NEC (National Electrical Code) requirements, and many jurisdictions require permits for new circuits or fixture relocations. Check local codes before starting.
If replacing an existing fixture, remove the old unit and inspect the electrical box. Look for rust, cracks, or loose mounting. Replace damaged boxes with outdoor-rated models, they have gaskets and weatherproof covers that indoor boxes lack. The box must be firmly attached to structural framing, not just drywall or ceiling panels.
For new installations without existing wiring, running cable through enclosed soffits is straightforward for most DIYers. Surface-mounted conduit works where concealment isn’t possible but looks industrial. Hire a licensed electrician for work that requires cutting into walls, fishing wire through insulation, or connecting to the main panel. Many regions consider this beyond DIY scope.
When mounting industrial cage lights or similar heavy fixtures, use the provided mounting bracket rather than hanging directly from wires. Connect wires using twist-on wire connectors rated for outdoor use (they’re usually filled with silicone). Match wire colors: black to black (hot), white to white (neutral), and green or bare copper to ground.
Apply a bead of silicone caulk around the ceiling box before seating the fixture’s canopy. This prevents moisture intrusion even if the gasket fails over time. Tighten mounting screws firmly but don’t over-torque, it can crack the fixture housing or strip the box threads.
Test the fixture before finishing. Turn the breaker back on and verify operation. If using LED bulbs, let them run for 5 minutes to confirm they don’t flicker or overheat. Some fixtures include motion sensors or photocells, test those functions as well.
Required PPE: safety glasses when working overhead, gloves when handling metal fixtures with sharp edges, and insulated tools when working near live circuits (though all work should be done with power off).
Design Ideas to Elevate Your Outdoor Living Areas
Layer lighting instead of relying solely on ceiling fixtures. Combine overhead lights with wall sconces, string lights, or path lighting to create depth and eliminate harsh shadows. Ceiling fixtures provide the primary illumination, while accent lights add visual interest.
For covered porches, place a flush mount at the entry and add pendant lights over seating zones. This zones the space and provides focused light where activities happen. Many homeowners appreciate the flexible control that a lighting layout tool offers when planning multiple fixture placements.
On dining patios, hang a pendant or chandelier centered over the table at 30 to 36 inches above the tabletop. This height provides even illumination without glare. Pair it with perimeter flush mounts for pathway safety when moving to and from the house.
For high or vaulted ceilings in screened porches, consider recessed cans angled toward seating areas rather than straight down. This reduces the spotlight effect and improves facial illumination for conversations. Alternatively, use larger-scale pendants to fill the vertical space and draw the eye upward.
In coastal or humid climates, choose fixtures with stainless steel or marine-grade hardware. Experts at Southern Living emphasize the importance of corrosion-resistant finishes in regions with salt air or high humidity. Even covered areas experience moisture accumulation that accelerates rust.
Smart bulbs or switches add convenience without rewiring. Control brightness, color temperature, and on/off schedules from a phone. Some systems integrate with motion sensors or timers to automate lighting based on sunset times.
For decks without overhead cover, use UL Wet-rated surface-mount fixtures attached to posts or beams. These aren’t technically ceiling lights but mount similarly and provide overhead illumination where traditional ceiling fixtures won’t work. Ensure all connections are weatherproofed with conduit and sealed junction boxes.
Consider energy costs when choosing bulbs. An outdoor light running 4 hours per night consumes roughly 30 kWh per year at 20 watts (LED). At $0.13 per kWh, that’s under $4 annually per fixture. Incandescent equivalents at 75 watts would cost closer to $14, making LEDs the clear choice for longevity and efficiency.
Finally, test lighting at night before committing to fixture placement. What looks centered in daylight may create odd shadows after dark. Walk through the space, sit in chairs, and verify the light reaches where needed without creating glare. Resources like Sunset often highlight regional considerations for outdoor lighting, especially in western climates with extended outdoor living seasons.
Outdoor ceiling lighting isn’t just functional, it’s an invitation to use exterior spaces year-round. Choose fixtures that fit the exposure, install them correctly, and layer the lighting to create spaces that feel as intentional as any interior room. With proper planning and execution, a well-lit patio or porch becomes the most-used space in the home.


