
Pendant lighting isn’t just a fixture, it’s a focal point. Whether it’s over a kitchen island, dining table, or entryway, a well-placed pendant shapes the entire room. But here’s the thing: pre-made fixtures often come with pre-made limitations, limited cord lengths, rigid styles, and prices that climb fast. A DIY pendant lighting kit flips that script, giving homeowners full control over style, height, and finish without needing an electrician for every decision. These kits combine basic electrical components with swappable shades, making custom lighting accessible to anyone comfortable with a screwdriver and wire stripper.
Table of Contents
ToggleKey Takeaways
- A DIY pendant lighting kit costs $20–$60 and customizes affordably, offering the same aesthetic impact as $150–$500 pre-made fixtures.
- DIY pendant lighting kits include a modular design with swappable components like cord length, shade, and finish, allowing homeowners to adapt fixtures to any ceiling height or room style.
- Quality matters in socket material, cord gauge, and strain relief—invest in porcelain sockets, braided or PVC cord, and powder-coated hardware rather than plastic alternatives.
- Safety requires turning off power at the breaker, using a voltage tester, ensuring proper grounding, and verifying the junction box is rated for your shade’s weight.
- Creative styling options range from industrial metals and upcycled finds to hand-thrown ceramics and multi-pendant clusters, enabling one-of-a-kind designs impossible with store-bought fixtures.
What Is a DIY Pendant Lighting Kit?
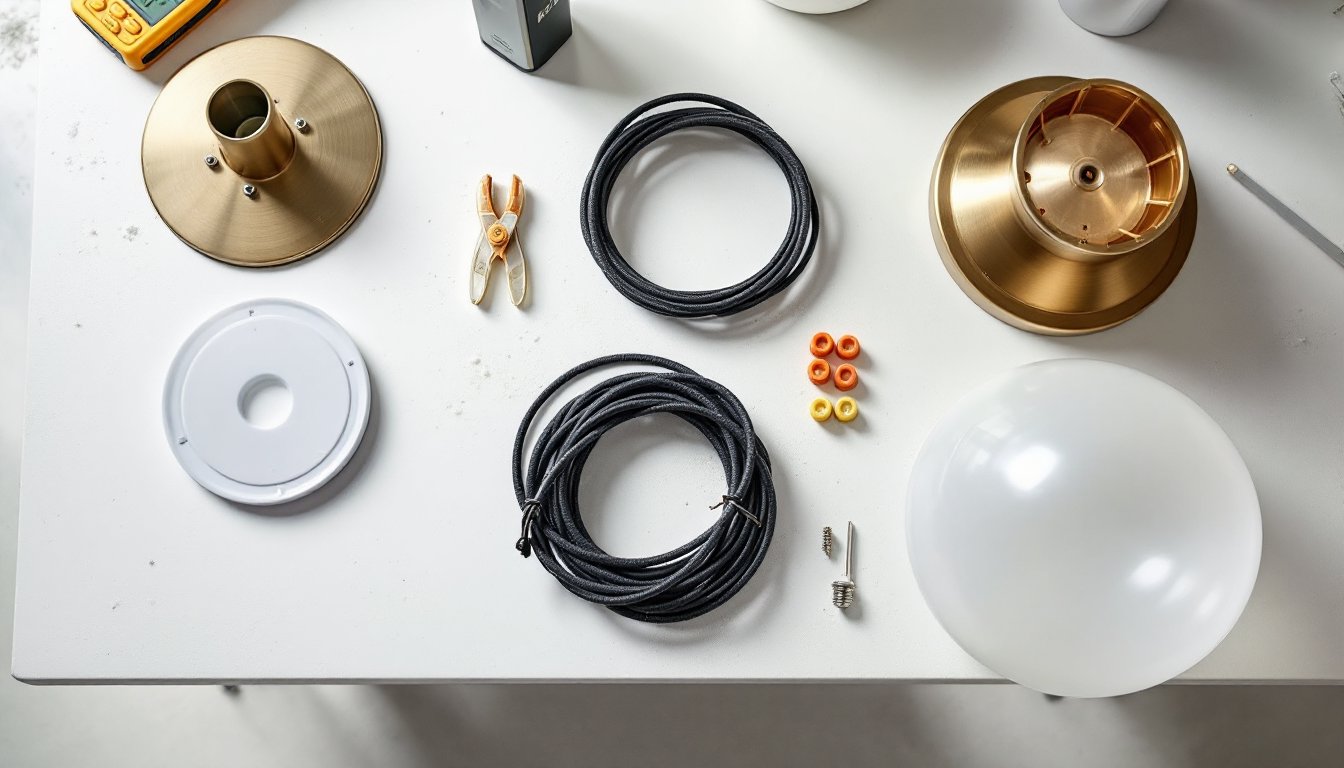
A DIY pendant lighting kit is a modular lighting system that includes the essential electrical components needed to hang and power a pendant light. Most kits contain a canopy (the ceiling-mounted cover plate), a socket (typically E26 or E27 for standard bulbs), cord or chain for suspension, and basic mounting hardware.
Unlike hardwired fixtures that arrive fully assembled, these kits are designed for customization. The shade is usually sold separately, or not at all. That’s intentional. The idea is to pair the electrical guts with a shade that fits the space, whether that’s a glass globe, a woven basket, a metal drum, or even a repurposed colander.
Some kits include an in-line dimmer switch or a plug-in adapter for renters who can’t hardwire into the ceiling box. Cord lengths typically range from 6 to 15 feet, and most use 18-gauge lamp cord rated for residential lighting. The socket is often a standard Edison base, compatible with LED, CFL, or incandescent bulbs up to 60 to 100 watts, depending on the fixture rating.
Why Choose a DIY Pendant Lighting Kit Over Pre-Made Fixtures
Cost is the most immediate reason. Pre-made designer pendants can run $150 to $500 each. A quality DIY kit costs $20 to $60, and even with a custom shade, the total often stays under $100.
Customization is the second. Standard fixtures lock homeowners into a single cord length, finish, and shade. DIY kits let them adjust the drop height to fit vaulted ceilings, soffits, or low-slung beams. They can swap shades seasonally or match finishes to existing hardware without replacing the entire fixture.
Accessibility matters, too. Many kits are designed for renters or anyone hesitant to hire an electrician. Plug-in kits with ceiling hooks avoid hardwiring entirely, while hardwired versions still simplify the process compared to cutting into a junction box from scratch.
Finally, there’s the creative angle. DIY pendant kits open the door to one-of-a-kind designs, hand-thrown ceramic shades, vintage wire baskets, or machined metal forms from local makers. That’s something a big-box fixture can’t deliver.
Essential Components of a Quality Pendant Lighting Kit
Not all kits are created equal. Here’s what separates a solid system from a flimsy one:
Socket and lamp holder: Look for porcelain or phenolic sockets, not plastic. They handle heat better, especially with higher-wattage bulbs or enclosed shades. The socket should have a UL listing for safety.
Cord: Braided fabric cord looks great and hides minor kinks, while PVC-jacketed cord is easier to clean in kitchens. Standard kits use SPT-2 lamp cord (18-gauge, two-conductor), rated for up to 10 amps. If the kit offers a choice, go with a cord length slightly longer than needed, it’s easier to trim excess than splice in more.
Canopy and mounting hardware: The canopy should be powder-coated steel or brass, not stamped tin. It needs to cover the junction box completely and include a lock ring or set screw to secure the cord. Check that the kit includes a crossbar compatible with standard 4-inch octagonal or round junction boxes.
Strain relief: This is a small component but critical. A cord grip or bushing prevents the cord from pulling free under the weight of the shade. If the kit doesn’t include one, add it.
Hardware and wire nuts: Quality kits include grounding screws, wire nuts rated for 600V, and mounting screws long enough to reach the box’s threaded holes. If the kit skimps here, grab extras at the hardware store.
Step-by-Step Installation Guide for Your DIY Pendant Light
Before starting, turn off power at the breaker, not just the wall switch. Use a non-contact voltage tester to confirm the wires are dead. Wear safety glasses when working overhead.
Hardwired Installation
- Remove the old fixture (if applicable). Unscrew the canopy, disconnect the wires, and remove the crossbar.
- Install the new crossbar onto the junction box using the provided screws. Ensure it’s tight, this supports the entire fixture.
- Thread the cord through the canopy and cord grip. Slide the canopy up the cord so it’s out of the way.
- Strip the cord ends about ½ inch using wire strippers. If the cord is polarized (one conductor has ribbing or printing), note which is neutral.
- Connect the wires: Black (hot) to black, white (neutral) to white, and bare copper (ground) to the green screw on the crossbar or the box’s ground wire. Use wire nuts and wrap connections with electrical tape for extra security.
- Secure the canopy to the crossbar. Tighten the lock ring or set screws so the canopy sits flush against the ceiling.
- Install the shade onto the socket and screw in the bulb. Restore power and test.
Plug-In Installation
For renters or spaces without a ceiling box, many kits offer a swag hook option.
- Locate a ceiling joist using a stud finder. If the desired location isn’t over a joist, install a toggle bolt rated for at least 50 pounds.
- Screw in the swag hook and drape the cord from the hook to a wall outlet.
- Secure the cord along the ceiling and wall using cable clips (not staples, which can damage the insulation).
- Plug in and enjoy.
Safety note: If the existing junction box is old, loose, or not rated for the fixture’s weight, replace it with a fan-rated box (supports up to 50 pounds). Shades and globes add weight fast, and curbly.com’s DIY lighting tutorials often emphasize box stability as a common oversight.
Creative Styling Ideas for Custom Pendant Lights
The real fun begins once the electrical work is done. Here are proven approaches:
Industrial metals: Pair a matte black or brass cord kit with a perforated steel drum or wire cage shade. This works well over kitchen islands and in workshops. For a softer take on rustic style, many farmhouse lighting designs use galvanized metal or wire baskets for a lived-in look.
Natural materials: Woven rattan, bamboo, or seagrass shades bring texture to dining rooms and entryways. These work best with warm-toned bulbs (2700K) to enhance the organic feel.
Glass and ceramic: Clear, smoked, or colored glass globes are classic. Pair them with Edison-style LED bulbs (avoid actual incandescent unless you enjoy frequent bulb swaps). Hand-thrown ceramic shades from local potters add a custom element that’s impossible to replicate with mass-market fixtures.
Upcycled finds: Colanders, vintage funnels, mason jars, and thrifted baskets all make compelling shades. If using a non-traditional material, verify it’s heat-resistant and won’t char or off-gas near a hot bulb. Keep the bulb wattage low (25–40W) or switch to LED.
Multi-pendant clusters: Instead of one large fixture, hang three or five pendants at staggered heights. This works especially well over long dining tables or in open-concept spaces. Vary shade sizes or colors slightly for visual interest, and make sure all pendants share the same cord finish and bulb color temperature for cohesion. The spruce crafts’ home decor tutorials showcase many examples of successful cluster installations.
Common Mistakes to Avoid When Building Your Own Pendant Lighting
Ignoring bulb clearance: Shades need at least 1 to 2 inches of clearance around the bulb to prevent overheating. Enclosed shades or metal drums get hot, use LED bulbs rated for enclosed fixtures.
Wrong cord length: Measure from the ceiling to the desired hanging point, then add 12 inches for wiring slack inside the canopy. Cords that are too short force awkward compromises.
Skipping the ground wire: Even if the old fixture wasn’t grounded, the new one should be. If the junction box is plastic or has no ground screw, run a ground wire to the nearest metal box or install a self-grounding crossbar.
Overloading circuits: Each pendant draws current based on bulb wattage. Five 60W bulbs on one circuit is 300 watts, well within the typical 15-amp circuit limit (1800 watts at 120V). But if that circuit also powers outlets, appliances, or other lights, calculate the total load to avoid tripping breakers.
Forgetting the canopy gap: If the ceiling isn’t perfectly flat, common with popcorn texture or older plaster, the canopy may not sit flush. Use a ceiling medallion or add a rubber gasket behind the canopy for a clean fit.
Not consulting codes: Most jurisdictions require a permit for new electrical installations, though replacing an existing fixture is usually exempt. When in doubt, check local building codes or call the inspector’s office. For in-depth walkthroughs of wiring best practices, instructables.com’s electrical project guides cover everything from basic connections to more advanced multi-fixture setups.
Conclusion
DIY pendant lighting kits deliver custom style without custom pricing. They offer flexibility that pre-made fixtures can’t match, whether that means adjusting cord length, swapping shades, or designing around a specific room feature. With basic electrical knowledge, the right components, and attention to safety, anyone can turn a kit into a standout fixture that looks twice its cost.


