
Good kitchen lighting isn’t just about seeing what you’re chopping, it’s about safety, functionality, and making a space people actually want to spend time in. Too many kitchens rely on a single overhead fixture that casts shadows exactly where you need light most: over the sink, the stove, and the cutting board. The fix isn’t complicated, but it does require some planning. With the right combination of fixtures and a clear understanding of how light layers work, any kitchen can go from dim and frustrating to bright and efficient.
Table of Contents
ToggleKey Takeaways
- Layered kitchen lighting—combining ambient, task, and accent light—eliminates shadows and improves both safety and functionality in cooking spaces.
- Under-cabinet LED strips and pendant lights positioned 30-36 inches above islands deliver focused task lighting that prevents accidents and enhances food preparation visibility.
- Kitchen lighting ideas should include recessed ceiling lights spaced 4-6 feet apart for ambient coverage, typically requiring 50-75 lumens per square foot for optimal illumination.
- Use cool white LEDs (4000K-5000K) for task areas to ensure accurate food color rendering, while warm white (2700K-3000K) works well for ambient and accent layers.
- A well-lit kitchen increases home resale value and photographs better, making strategic lighting upgrades a worthwhile investment even for modest kitchens.
- Start with under-cabinet task lighting as your first upgrade—it provides the most immediate improvement and can be installed as a DIY project without electrical modifications.
Why Kitchen Lighting Matters More Than You Think
A poorly lit kitchen is more than an inconvenience, it’s a safety hazard. Dull lighting over a cooktop or prep area increases the risk of cuts, burns, and mistakes. Shadows fall across countertops right where sharp knives and hot pans live. Beyond safety, lighting affects how colors appear, which matters when you’re checking if meat is cooked through or vegetables are starting to brown.
Good lighting also sets the tone. A kitchen with balanced, layered light feels welcoming and functional. One with a single harsh overhead bulb feels clinical or dim depending on wattage. The difference isn’t about spending thousands on custom fixtures, it’s about placing the right type of light in the right spot.
Another practical consideration: resale value. Kitchens sell homes, and buyers notice lighting. A well-lit kitchen photographs better, shows off finishes, and signals that the space has been thoughtfully updated. It’s one of those upgrades that doesn’t scream “expensive remodel” but still makes an impression.
Layered Lighting: The Foundation of a Well-Lit Kitchen
Layered lighting is the industry standard for a reason. It combines three types of light, ambient, task, and accent, to eliminate shadows, highlight features, and provide flexibility. Each layer serves a distinct purpose, and all three work together to create a balanced, functional space.
Ambient Lighting for Overall Illumination
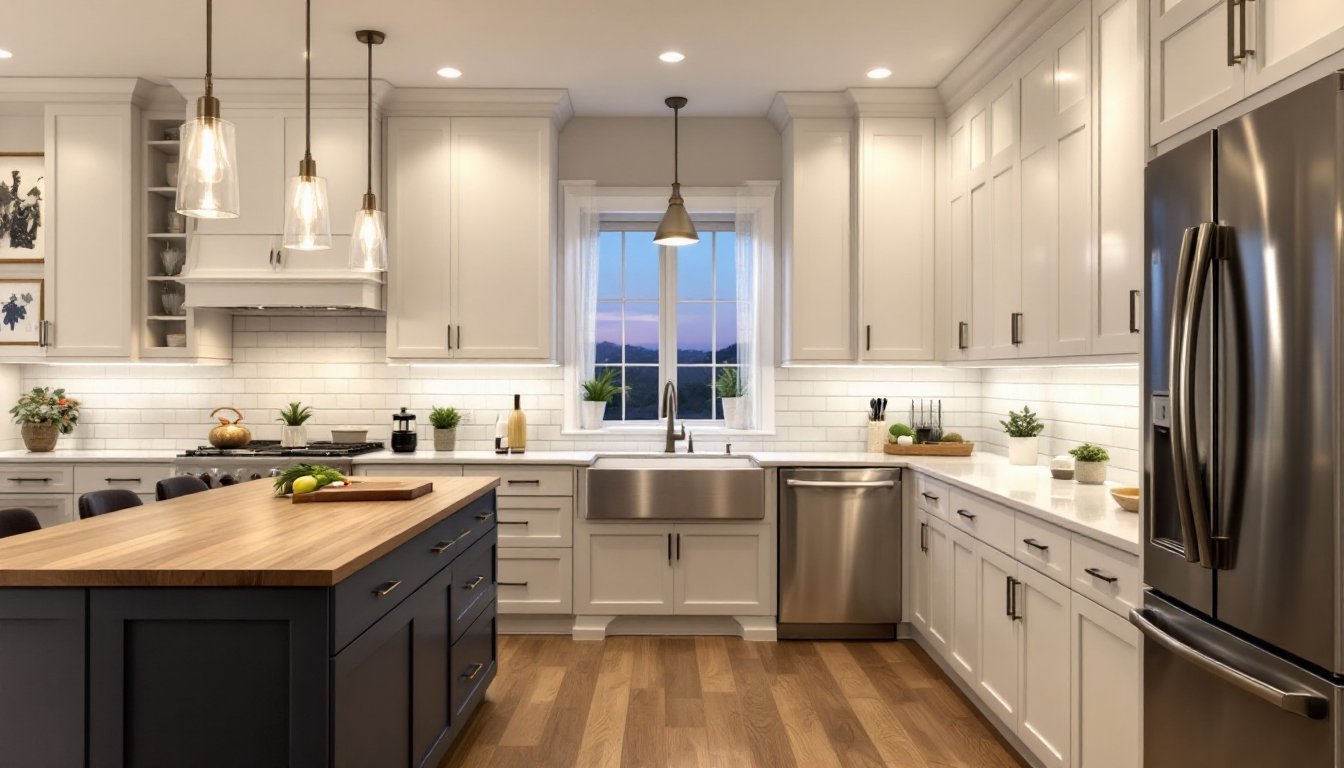
Ambient lighting is the base layer. It fills the room with general illumination so you can move around safely and see the overall layout. In most kitchens, this comes from ceiling-mounted fixtures: recessed cans, flush mounts, or semi-flush fixtures.
Recessed lighting (also called can lights) is the most common choice. Space them 4 to 6 feet apart in a grid pattern for even coverage. Use 4-inch cans for an 8-foot ceiling, 5- or 6-inch cans for 9-foot or higher ceilings. Many homeowners installing flush mount fixtures appreciate the low-profile look, especially in kitchens with limited ceiling height.
For ambient lighting, aim for 50 to 75 lumens per square foot. A 120-square-foot kitchen needs roughly 6,000 to 9,000 lumens total. If you’re using LED bulbs (and you should be), that translates to about six to eight 800- to 1,000-lumen bulbs distributed across the ceiling.
Don’t rely on a single central fixture. Pendant lights over an island add style, but they won’t light the whole room. You’ll end up with bright spots and dark corners.
Task Lighting for Prep Areas and Workspaces
Task lighting targets specific work zones: countertops, the sink, the range, and the island. This is where you chop, measure, read recipes, and wash dishes. Shadows here are more than annoying, they’re dangerous.
Under-cabinet lighting is the workhorse of task lighting. It mounts beneath upper cabinets and aims downward onto countertops, eliminating the shadow your body casts when standing at the counter. Options include LED strip lights, puck lights, and linear bars.
LED strips are the most versatile. They’re thin, linkable, and available in various color temperatures. Install them toward the front edge of the cabinet base (not the back wall) to minimize glare on glossy countertops. Hardwired strips with a wall switch are cleaner than plug-in versions, but plug-in works fine for renters or quick upgrades.
Puck lights are small, disc-shaped fixtures spaced every 12 to 18 inches. They create pools of light rather than a continuous wash. They’re easier to retrofit into existing cabinets but can look spotty if spacing is off.
For island task lighting, pendant fixtures work well. Hang them 30 to 36 inches above the countertop (or 72 inches from the floor) to avoid head-bumping. Use at least two pendants for islands over 4 feet long. Choose fixtures with downward-facing shades or diffusers to direct light onto the work surface, not into people’s eyes.
Over the sink, a single pendant or a small flush mount provides focused light without competing with a window (if you have one). Over the range, the built-in hood light usually suffices, but verify it’s bright enough, many builder-grade hoods have weak bulbs.
Task lighting should deliver 75 to 100 lumens per square foot in work zones. Use daylight or cool white LEDs (4000K to 5000K) for accurate color rendering when prepping food. Warm white (2700K to 3000K) is fine for ambient layers but can make vegetables look dull.
Accent Lighting to Highlight Design Features
Accent lighting adds depth and visual interest. It’s not about function, it’s about showcasing materials, textures, and architectural details. Think glass-front cabinets, open shelving, a tile backsplash, or floating shelves.
In-cabinet lighting highlights glassware, dishware, or collectibles inside cabinets with glass doors. Small LED puck lights or strips mount inside the cabinet top or sides. Use warm white (2700K) to create a cozy glow.
Toe-kick lighting installs along the base of lower cabinets, washing the floor with a soft glow. It’s subtle, modern, and surprisingly practical as a night light. LED strips are the standard: many are motion-activated.
Above-cabinet lighting works if there’s a gap between the cabinet tops and the ceiling. LED strips placed on top of cabinets cast an uplight that bounces off the ceiling and adds ambient fill. It softens the room and makes ceilings feel higher.
Accent lighting is optional and typically controlled separately so it can be turned off when not needed. It’s most effective when the rest of the lighting is already dialed in. For design inspiration, Houzz’s kitchen lighting gallery offers thousands of real-world examples showing how accent lights enhance different styles.
Popular Kitchen Lighting Fixtures and Where to Use Them
Choosing fixtures means matching form, function, and installation requirements to your kitchen layout and skill level. Here’s a breakdown of the most common types.
Recessed Lights (Can Lights)
Pros: Clean look, no head clearance issues, widely available, dimmable.
Cons: Requires ceiling access for installation (attic space or removing drywall). Not ideal for vaulted ceilings without special housings.
Best for: Ambient lighting in kitchens with standard or high ceilings.
Installation note: Running new electrical to multiple cans may require a permit and an electrician, especially if you’re adding circuits. Check local codes.
Flush and Semi-Flush Mounts
Pros: Single-fixture installation, good for low ceilings, range from basic to decorative.
Cons: A single fixture rarely provides enough light for a whole kitchen. Bulb replacement can be awkward on decorative models.
Best for: Small kitchens, hallways leading into kitchens, or supplemental ambient light.
Installation note: These typically replace an existing ceiling box, making them a straightforward DIY swap if you’re comfortable with basic wiring.
Pendant Lights
Pros: Stylish, functional task light over islands and peninsulas, available in endless designs.
Cons: Hanging height is critical, too low and they’re in the way, too high and they don’t light the work surface. Requires a ceiling box.
Best for: Task lighting over islands, peninsulas, breakfast bars, or sinks (if centered).
Installation note: If the ceiling box isn’t where you need it, relocating it means cutting drywall and running cable. Measure twice.
Track Lighting
Pros: Adjustable heads let you aim light exactly where it’s needed. One electrical connection powers multiple heads.
Cons: Can look dated if not chosen carefully. Not subtle.
Best for: Kitchens with awkward layouts, vaulted ceilings, or renters who want flexibility without permanent changes.
Installation note: Most track systems install onto a standard ceiling box. Linear tracks come in 4- and 8-foot sections. Look for modern LED track heads to keep the look current.
Linear LED Fixtures
Pros: Sleek, even light distribution, dimmable, energy-efficient. Often linkable.
Cons: More expensive upfront than basic fluorescents or incandescents (but pay back in energy savings).
Best for: Under-cabinet task lighting, over-sink task lighting, or as ambient fixtures in contemporary kitchens.
Installation note: Hardwired versions require a junction box or direct connection. Plug-in versions are easier but need an outlet nearby.
Chandeliers
Pros: Statement piece, works over large islands or in eat-in kitchen areas.
Cons: Provides ambient or decorative light, rarely sufficient as task light. Can be expensive and heavy.
Best for: Large islands (6+ feet), dining areas within open-plan kitchens.
Installation note: Verify the ceiling box is rated for the fixture weight. Boxes rated for ceiling fans handle most chandeliers, but check the specs.
Smart Bulbs and Dimmers
Not a fixture type, but worth mentioning. Smart bulbs (Philips Hue, LIFX, etc.) let you adjust color temperature and brightness via app or voice control. Dimmers give you flexibility to dial light up for cooking and down for dining.
Pros: Total control over ambiance, programmable scenes, some integrate with motion sensors.
Cons: Smart bulbs are pricier per unit, require a hub (sometimes), and won’t work if someone flips the wall switch off.
Installation note: Pair with compatible dimmer switches for best results. Not all LEDs are dimmable, check packaging.
For farmhouse or rustic designs, fixtures with Edison bulbs, wrought iron, or distressed finishes add character without sacrificing function. For industrial looks, cage pendants and exposed-bulb fixtures work well over islands or in open-concept layouts. Decorative fixtures should still meet the functional requirements of their layer, don’t sacrifice light output for style alone.
Color Temperature and CRI
Color temperature (measured in Kelvin) affects how light feels and how colors appear. Warm white (2700K–3000K) mimics incandescent bulbs and feels cozy. Daylight (5000K–6500K) is crisp and clinical. Cool white (4000K) is the middle ground, bright enough for task work, neutral enough not to feel harsh.
CRI (Color Rendering Index) measures how accurately a light source shows true colors. A CRI of 90 or above is ideal for kitchens. Low-CRI bulbs make food look unappetizing and can throw off color matching when cooking.
Use consistent color temperature within each layer. Mixing 2700K ambient lights with 5000K task lights will make the space feel disjointed. It’s fine to vary slightly (ambient at 3000K, task at 4000K), but avoid extremes.
Electrical and Code Considerations
Most kitchen lighting upgrades involve electrical work. Swapping a fixture on an existing box is straightforward if you follow basic safety: turn off the breaker, verify power is off with a tester, match wire colors (black to black, white to white, ground to ground), and secure connections with wire nuts.
Adding new circuits, recessed cans, or undercabinet lighting typically requires running new cable through walls or ceilings. This isn’t difficult if you have attic or basement access, but it’s time-consuming and might require a permit depending on local codes.
Kitchens fall under the National Electrical Code (NEC), which mandates GFCI protection for countertop outlets and specific spacing for receptacles. Lighting circuits don’t always require GFCI, but any new work should meet current code. Check with your local building department if you’re adding circuits or significantly altering the electrical layout.
If you’re uncomfortable working with electrical, hire a licensed electrician. It’s not an area to wing it. Incorrect connections can cause fires, shocks, or failed inspections if you’re selling.
Budget and Planning
Budget varies wildly depending on fixture choice, labor, and how much wiring is needed. A basic under-cabinet LED strip kit runs $40–$100. A set of three midrange pendant lights costs $150–$400. Recessed can installation (including housings, trims, and bulbs) averages $100–$200 per light if you hire it out, less if you DIY.
Plan your layout using a lighting layout tool or sketch it on graph paper. Mark existing electrical boxes, desired fixture locations, and switch positions. Identify which fixtures are ambient, task, or accent. Group lights onto separate switches or dimmers so you can control layers independently.
Don’t forget: buy extra bulbs. Nothing’s more annoying than finishing an install and realizing you’re two bulbs short. And always check the return policy, lighting looks different installed than it does in the box.
Conclusion
Good kitchen lighting doesn’t happen by accident. It’s a combination of planning, layering, and choosing the right fixtures for each task. Whether upgrading a single fixture or overhauling the entire lighting scheme, the result should be a space that’s safer, more functional, and more enjoyable to use. For additional expert perspectives on modern kitchen lighting trends and fixture recommendations, explore design resources that showcase real-world applications. Start with one layer, task lighting is usually the biggest immediate improvement, and build from there.


