
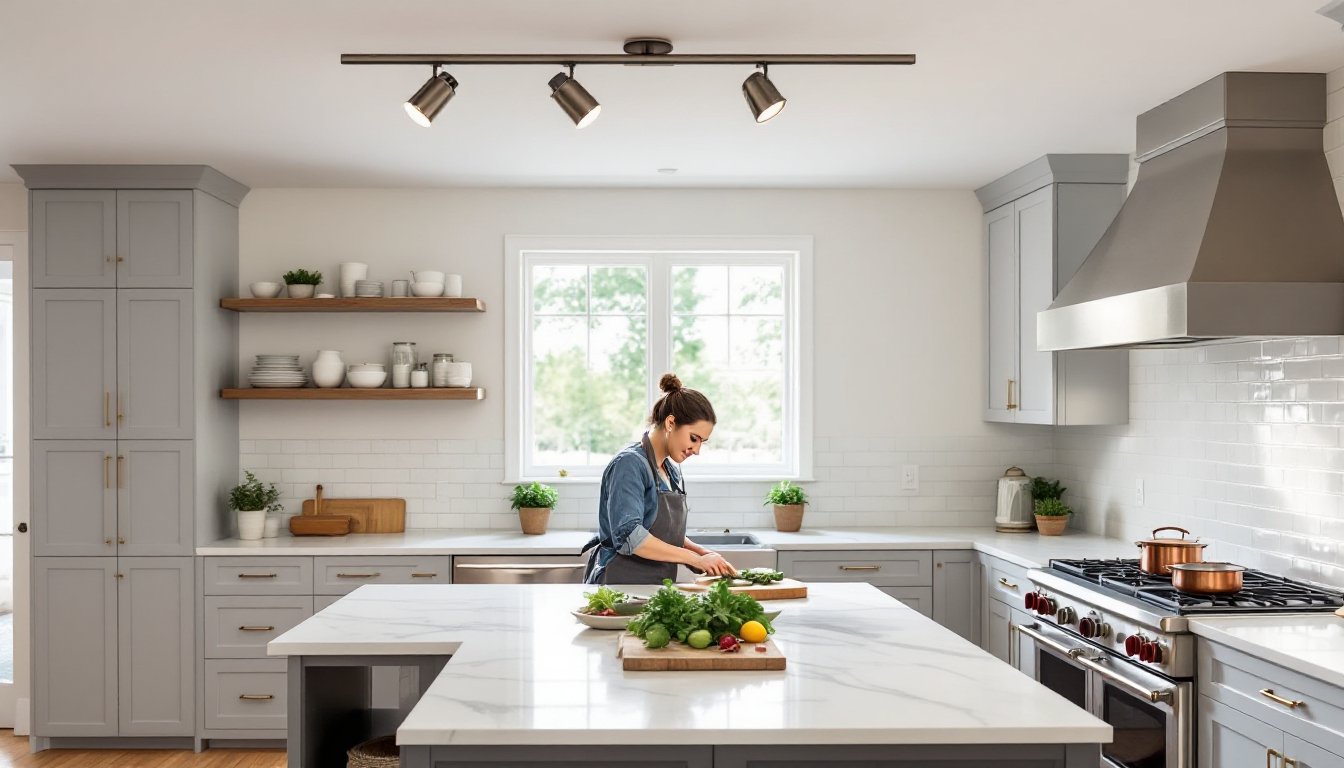
Track lighting has quietly become one of the smartest solutions for kitchen illumination, flexible, targeted, and surprisingly easy to retrofit. Unlike fixed ceiling fixtures that leave corners in shadow, track systems let you aim light exactly where you need it: over counters, islands, or that dark spot by the pantry. Whether you’re prepping vegetables, reading recipes, or showcasing new backsplash tile, the right track lighting adapts to the task. This guide walks through why track lighting works so well in kitchens, what features matter most, which systems deliver the best value in 2026, and how to install them without calling an electrician.
Table of Contents
ToggleKey Takeaways
- Track lighting for kitchen use offers unmatched flexibility by directing light exactly where you need it—over counters, islands, and work zones—without the shadows left by fixed ceiling fixtures.
- Choose LED bulbs rated for 3000K to 4000K color temperature; warmer tones (3000K) suit dining areas while cooler temperatures (4000K+) enhance visibility for detail work like chopping and food prep.
- H-type tracks dominate North America and offer budget-friendly options like Lithonia and Hampton Bay ($60–$100), while premium systems like WAC and Tech Lighting ($200–$600+) provide designer aesthetics and advanced dimming features.
- Installation requires only basic tools and an hour for most replacements, but always verify electrical compatibility, use an LED-specific dimmer to avoid flicker, and consult your local building department about permit requirements.
- Position tracks 18–24 inches from walls on counters to prevent shadows, center them lengthwise over islands, and use narrow beam angles (15–30°) for task lighting and wide angles (60–90°) for ambient coverage.
Why Track Lighting Works Perfectly in Kitchens
Kitchens demand versatile lighting. A single overhead fixture might illuminate the center of the room but leaves work surfaces in shadow. Track lighting solves this by mounting multiple adjustable heads on a single rail, letting you direct beams wherever they’re needed.
Flexibility is the biggest advantage. You can angle heads toward the sink, stove, or cutting board, then adjust them as your layout changes. Add a new coffee station? Pivot a head. Rearranged the island? Slide a fixture along the track. Most systems use a conductor bar inside the rail that powers heads anywhere along its length, no rewiring required.
Track systems also handle task and accent lighting in one install. Point heads downward for food prep, or angle them to highlight open shelving, glassware, or artwork. This dual function reduces clutter on the ceiling compared to mixing recessed cans, pendants, and picture lights.
Installation is straightforward if you’re replacing an existing ceiling fixture. The track mounts to a standard junction box, and most kits include the mounting plate and canopy. You’ll need basic tools, a drill, screwdriver, wire stripper, and about an hour. If you’re adding a new circuit or dealing with a sloped ceiling, hire a licensed electrician. Kitchen electrical work often requires permits under the National Electrical Code (NEC), especially if you’re running new wire or increasing load on a circuit.
Track lighting also works in kitchens with low ceilings or where recessed cans aren’t an option. Tracks sit flush or just a few inches below the ceiling plane, preserving headroom while delivering focused light.
Key Features to Consider When Choosing Kitchen Track Lighting
Not all track systems are built the same. Here’s what to evaluate before buying.
Track Type and Compatibility
Three main standards exist: H-type, J-type, and L-type. Each has a different cross-section and connector design, and heads from one type won’t fit another track. H-type is most common in North America and works with many budget fixtures. J-type and L-type are often found in commercial or designer lines. Check compatibility before mixing brands, some manufacturers use proprietary systems.
Power and Bulb Type
Most residential track systems run on 120V AC and connect directly to household current. Look for tracks rated for at least 15 amps to handle multiple high-wattage heads. For bulbs, LED is the clear winner in 2026: longer lifespan (20,000+ hours), lower heat output, and better energy efficiency than halogen or incandescent. Many modern systems use integrated LED heads, eliminating bulb replacement but locking you into that fixture’s color temperature and brightness.
Color Temperature
Kitchens benefit from 3000K to 4000K (warm white to neutral white). Cooler temps (4000K+) boost visibility for detail work like chopping: warmer tones (3000K) feel cozier for dining areas. Adjustable or tunable white LEDs let you shift temperature as needed, though they cost more.
Beam Angle and Dimming
Narrow beam angles (15–30°) create focused pools of light ideal for task areas. Wide angles (60–90°) spread light for ambient coverage. Many track heads offer adjustable reflectors. For dimming, confirm the track and heads are dimmable and pair them with a compatible dimmer switch, not all LEDs dim smoothly with standard dimmers. Look for ELV (electronic low-voltage) or LED-specific dimmers to avoid flicker.
Finish and Aesthetic
Tracks come in white, black, brushed nickel, bronze, and more. Match the finish to cabinet hardware or faucets for a cohesive look. Sleek, low-profile tracks suit modern kitchens: chunkier industrial styles pair well with farmhouse or rustic designs.
Length and Configuration
Standard tracks run 4 feet or 8 feet, but you can link multiple sections with connectors to span longer runs. Flexible track (monorail) bends around curves or follows soffits, offering creative routing at a premium price.
Top Track Lighting Systems for Modern Kitchens
Below are proven systems across budget and style ranges. Prices reflect 2026 market averages and vary by region and retailer.
Best Budget-Friendly Track Lighting Options
Lithonia Lighting Track Kits (around $60–$90 for a 4-foot kit with three heads)
Lithonia dominates the value segment. Their H-type kits include the track, three adjustable heads, and an installation plate. Heads accept standard MR16 or GU10 LED bulbs, so you control color temp and brightness. Build quality is serviceable, plastic housings and basic finishes, but they’re easy to install and widely available at home centers. Good for renters or anyone testing track lighting before committing to a pricier system.
Globe Electric Track Lighting (around $50–$80)
Another budget pick with integrated LED heads. Globe’s kits often feature matte black or brushed steel finishes and deliver 800–1000 lumens per head. The integrated LEDs mean no bulb shopping, but you can’t change color temperature later. Expect a 3000K warm white in most models. These work well over islands or breakfast nooks where you want simple, modern aesthetics without complexity.
Hampton Bay Track Systems (around $70–$100)
Sold through Home Depot, Hampton Bay offers H-type tracks with a step up in finish quality, brushed nickel, oil-rubbed bronze. Heads are dimmable and accept LED bulbs. The track itself is steel, not aluminum, adding a bit of heft. Installation mirrors other H-type systems: mount to a junction box, wire hot/neutral/ground, snap on the canopy.
Premium Track Lighting for Designer Kitchens
WAC Lighting Systems (kits start around $200–$400)
WAC is a favorite among designers for clean lines and robust engineering. Their L-type systems feature low-voltage (12V) LED heads with excellent color rendering (CRI 90+) and tight beam control. Heads rotate 350° and tilt 90°, giving precise aim. Many models include integrated dimming and color-tuning via remote or app. The track itself is sleek, under an inch wide, and available in custom lengths. Installation requires a transformer (included) to step down household 120V to 12V. Worth the cost if lighting quality and aesthetics matter.
Tech Lighting MonoRail (kits from $300–$600+)
Tech’s flexible monorail bends to follow curves, wrap around beams, or create custom shapes. It’s a two-conductor low-voltage system (12V) with a huge selection of head styles, pendants, spots, cylinders. Color temps range from 2700K to 4000K, and many heads are field-adjustable. Installation is more involved: the rail clips into surface-mount standoffs, and you’ll need to plan the route carefully. This system shines in kitchens with vaulted ceilings, open floor plans, or unique architectural features.
Juno Track Lighting (kits around $150–$300)
Juno splits the difference: better than budget kits, more accessible than ultra-premium. Their Trac-Lites line uses line-voltage (120V) with solid metal construction and a wide range of head styles. Heads are compatible with GU10 or PAR20 LEDs, so you can upgrade bulbs as technology improves. Juno also offers smart-home integration on select models, letting you control brightness and scenes via app. Good choice for serious DIYers who want quality without custom pricing.
Installation Tips and Placement Strategies
Even the best track system fails if installed poorly. Follow these guidelines for clean results.
Electrical Prep
Turn off power at the breaker, verify with a non-contact voltage tester. If replacing an old fixture, the existing junction box should work as long as it’s rated for the track’s weight (check the kit specs). If adding a new track where no fixture existed, you’ll need to run cable from a switch or panel, hire a licensed electrician unless you’re confident working with house wiring.
Mounting the Track
- Mark the track position on the ceiling using a pencil and level. For an island, center the track lengthwise. For counters, position it 18–24 inches from the wall to avoid shadows from upper cabinets.
- Attach the mounting plate to the junction box with screws.
- Connect the track’s wires to the house wiring: black to hot, white to neutral, green or bare to ground. Use wire nuts and wrap connections with electrical tape.
- Tuck wires into the box and snap the track canopy over the plate.
- Secure the far end of the track to ceiling joists or use toggle anchors if mounting to drywall. Most tracks weigh under 10 pounds, but anchors prevent sagging.
Positioning Heads
Slide heads onto the track and twist to lock. Aim them at task zones first, sink, stove, main prep counter, then fill in ambient coverage. Keep heads at least 6 inches from walls to reduce glare and hot spots.
For a standard 10×12-foot kitchen, a single 8-foot track with four to six heads typically provides adequate task and ambient light. Larger kitchens may need multiple tracks or a combination of track and flush-mount fixtures for even coverage.
Dimmer Installation
If adding a dimmer, replace the existing switch with an LED-compatible model. Follow the dimmer’s wiring diagram, most connect the same way as a standard switch but include a ground wire. Test the full dimming range: if lights flicker at low settings, try a different dimmer or check for incompatible bulbs.
Safety Gear
Wear safety glasses when drilling into ceilings, drywall dust and debris fall directly into your eyes. Use a sturdy stepladder, not a chair. If working near plumbing or in a kitchen with a gas range, double-check you’re not drilling into pipes or vents.
Permit Requirements
Replacing a fixture on an existing circuit rarely requires a permit, but adding new circuits or relocating junction boxes often does. Check with your local building department. Inspectors care most about proper wire gauge, box fill, and grounding, track lighting itself isn’t high-risk, but improper wiring is.
Maintenance
Dust heads and track quarterly with a dry microfiber cloth. For outdoor or open-concept spaces, grease and moisture can accumulate, wipe with a damp cloth and mild detergent. Replace LED bulbs or integrated heads when output drops noticeably, typically after 20,000+ hours.
Conclusion
Track lighting delivers the flexibility, focus, and adaptability that busy kitchens demand. By choosing the right system for your budget and style, matching color temperature to task needs, and installing with care, homeowners can achieve professional-quality illumination without contractor costs. Whether upgrading a rental or executing a full remodel, track lighting remains one of the most practical and forgiving choices in kitchen design.


