
Under cabinet lighting has evolved from a luxury upgrade to a practical necessity in modern kitchens. It eliminates shadows on countertops, improves safety during meal prep, and adds ambiance that overhead fixtures can’t match. Whether you’re renovating or simply upgrading your workspace, the right lighting can dramatically change how your kitchen looks and functions. With dozens of fixture types, power options, and installation methods available, choosing the best under cabinet lighting for your space requires understanding what each option delivers, and what it demands in return.
Table of Contents
ToggleKey Takeaways
- Under cabinet lighting eliminates shadows on countertops, improves kitchen safety during meal prep, and enhances both functionality and home resale value.
- LED strip lights are the most versatile under cabinet lighting option, offering flexibility for irregular layouts and requiring at least 300 lumens per foot for effective task lighting.
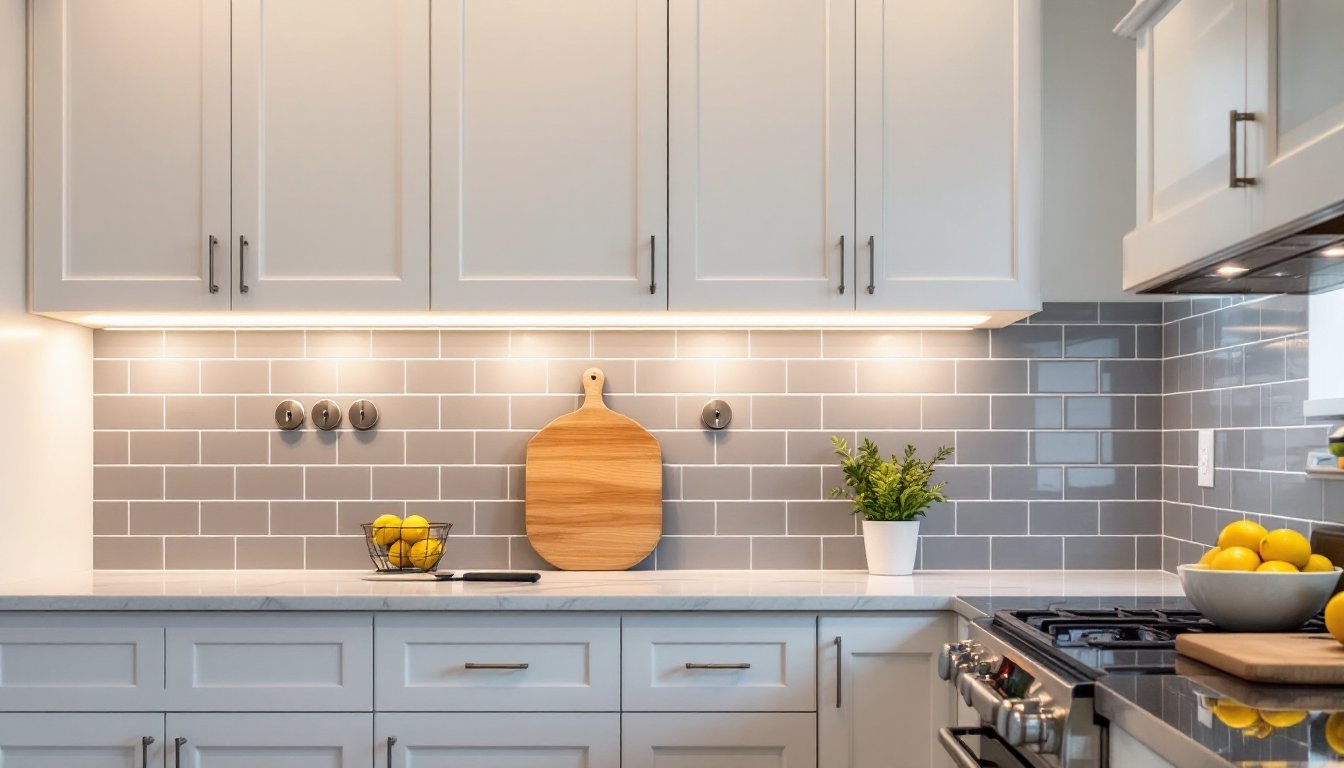
- Mount under cabinet fixtures 2 to 4 inches from the cabinet’s front edge to maximize countertop illumination while minimizing glare and light spill.
- Linear LED light bars deliver uniform, edge-to-edge coverage with integrated diffusers and extended lifespan, making them ideal for seamless, professional-looking installations.
- Smart under cabinet lighting systems with dimming capability and home automation integration offer customizable control, though they cost more and may be unnecessary for basic on/off functionality.
- Proper cable management, thorough surface cleaning with isopropyl alcohol, and careful spacing of fixtures 12 to 18 inches apart are essential for long-lasting, professional results.
Why Under Cabinet Lighting Is Essential for Modern Kitchens
Under cabinet lighting solves three critical problems at once: task lighting, safety, and aesthetics. Overhead lights cast shadows exactly where you’re working, over cutting boards, countertops, and stovetops. That shadow zone creates eye strain and makes precision tasks like chopping or measuring unnecessarily difficult.
From a safety standpoint, well-lit countertops reduce the risk of knife slips and burns. You’ll spot spills faster, notice food contamination more easily, and navigate your workspace with confidence even during early mornings or late evenings.
Aesthetically, under cabinet fixtures provide ambient lighting that showcases backsplashes, warms up the room, and creates visual depth. They highlight materials like subway tile, marble, or textured stone that would otherwise disappear in shadow. When designed thoughtfully, proper task lighting also increases home resale value, buyers notice functional details like this during walkthroughs.
Installation complexity varies widely. Plug-in fixtures require only an outlet and take minutes to mount. Hardwired options demand electrical work and may need a permit depending on jurisdiction, especially if you’re adding new circuits. Battery-powered units offer zero-install convenience but require regular recharging or battery swaps, which becomes tedious over time.
LED Strip Lights: The Most Versatile Option
LED strip lights (also called tape lights or ribbon lights) remain the most flexible under cabinet solution available. They come in adhesive-backed rolls, typically 16 feet long, and can be cut to length at designated copper pads every few inches. This makes them ideal for kitchens with varying cabinet widths or irregular layouts.
Look for strips rated at least 300 lumens per foot for task lighting. Anything dimmer works fine for accent lighting but won’t provide enough illumination for food prep. Color temperature matters: 3000K produces warm white light similar to incandescent bulbs, while 4000K offers neutral white that reduces eye strain during detailed tasks. Many DIYers opt for tunable white strips that adjust from 2700K to 5000K, giving flexibility for different times of day.
Most LED strips run on 12V or 24V DC power, requiring a plug-in transformer or hardwired driver. Higher-voltage 24V systems experience less voltage drop over long runs, making them better for kitchens longer than 10 feet. Always check the maximum run length specified by the manufacturer, exceeding it causes dimming at the far end.
Installation is straightforward: clean the underside of the cabinet with isopropyl alcohol, peel the backing, and press the strip firmly into place. For a cleaner look, consider mounting strips inside an aluminum channel with a frosted diffuser. Channels eliminate hotspots (individual LED dots showing through) and provide a more polished, continuous light line. They also improve heat dissipation, which extends LED lifespan.
The main drawback? Adhesive backing can fail over time, especially in humid environments or on porous surfaces. Use additional mounting clips or a dab of silicone adhesive every 12 inches for added security.
Puck Lights for Targeted Task Illumination
Puck lights are small, disc-shaped fixtures (typically 2.5 to 4 inches in diameter) that mount individually under cabinets. They excel at creating pools of focused light over specific work zones, ideal for highlighting a coffee station, sink area, or cutting board.
Each puck typically outputs 200 to 400 lumens, so plan on spacing them 12 to 18 inches apart for even coverage. Too much spacing creates dark gaps between fixtures: too little creates overlapping bright spots that feel harsh. Most setups require three to five pucks per standard 8-foot run of cabinets.
Puck lights come in three power formats: battery-operated, plug-in, and hardwired. Battery models offer the simplest install but need fresh batteries every few months with regular use. Plug-in versions connect via a low-voltage cable to a single transformer, which keeps wiring minimal. Hardwired pucks require running electrical cable through cabinets and may need an electrician, especially if you’re tapping into existing circuits.
One common mistake is mounting pucks too close to the cabinet’s front edge. Position them 2 to 3 inches back from the front to avoid glare and light spill into your sightline. The goal is to wash the backsplash and countertop, not blind anyone standing at the counter.
Puck lights work well in kitchens with open shelving or glass-front cabinets, where you want pinpoint accent lighting rather than continuous coverage. They’re less ideal for long, uninterrupted countertops where seamless light is preferable.
Linear Light Bars for Seamless, Even Coverage
Linear LED light bars are rigid fixtures, typically sold in 12-, 18-, 24-, and 36-inch lengths, that deliver uniform, edge-to-edge illumination. Unlike flexible LED strips, light bars come pre-assembled with integrated diffusers, making them plug-and-play right out of the box.
They’re built with aluminum housings that double as heat sinks, extending LED lifespan well beyond 50,000 hours. Most bars output 400 to 1,200 lumens depending on length, and they’re available in the same color temperature range as strips (2700K to 5000K). Many modern bars include energy-efficient LED technology that reduces power consumption by up to 75% compared to older fluorescent under cabinet fixtures.
Installation involves mounting brackets (usually included) screwed into the underside of the cabinet. Use a stud finder to locate solid mounting points, or use toggle bolts if attaching to hollow cabinet bottoms. Linking multiple bars together requires connector cables, which come in various lengths to match your cabinet spacing. Some systems allow daisy-chaining up to six fixtures on a single transformer, simplifying wiring significantly.
Light bars cost more per foot than LED strips, expect to pay $25 to $60 per fixture, but they offer a cleaner install and require no additional channels or diffusers. They’re a smart choice for rental properties or situations where you want a professional finish without permanent electrical work.
One trade-off: light bars are less flexible than strips. If your cabinets have irregular spacing or turn corners, you’ll need multiple shorter bars and careful planning to avoid dark spots.
Smart Under Cabinet Lighting for Customizable Control
Smart under cabinet lighting integrates with home automation systems like Amazon Alexa, Google Assistant, or Apple HomeKit, offering voice control, app-based dimming, and scheduling. Many systems also support color-changing LEDs, allowing you to shift from bright white task lighting during cooking to warm amber for evening ambiance.
Most smart fixtures connect via Wi-Fi or Zigbee/Z-Wave protocols. Wi-Fi models work standalone but can congest your network if you install dozens of devices. Zigbee and Z-Wave require a compatible hub (like Samsung SmartThings or Hubitat) but create a dedicated mesh network that’s more reliable and responsive.
Look for systems with dimming capability down to 1%, cheaper models bottom out at 10% or 20%, which is still too bright for late-night snacking. Smooth dimming curves matter, too: lower-quality controllers produce visible stepping or flickering as you adjust brightness.
Popular smart under cabinet options include Philips Hue Lightstrips, LIFX strips, and Govee systems. Hue offers the most polished app experience and widest ecosystem compatibility but requires a separate bridge ($60). LIFX connects directly to Wi-Fi without a hub, while Govee provides budget-friendly color options with decent app control.
Installation follows the same process as non-smart LED strips or bars, with the added step of pairing fixtures to your smart home hub or app. Budget an extra 15 to 30 minutes for setup and testing.
Smart lighting isn’t essential for everyone, if you’re happy with a simple on/off switch, you’ll save money with traditional fixtures. But for households that already use smart home devices, lighting accessories like dimmer switches and motion sensors can integrate seamlessly into existing setups.
Installation Tips and Placement Strategies
Proper placement makes the difference between functional lighting and wasted money. Mount fixtures toward the front third of the cabinet’s underside, roughly 2 to 4 inches from the front edge. This angle directs light onto the countertop and backsplash while minimizing glare. Mounting too far back creates shadows along the counter’s edge where you’re most likely to work.
Before installation, clean mounting surfaces thoroughly with isopropyl alcohol. Dust, grease, and moisture all compromise adhesive bonds. Let surfaces dry completely, at least 10 minutes, before applying any adhesive-backed fixture.
For hardwired installations, shut off power at the breaker and verify with a non-contact voltage tester before touching any wires. If you’re adding a new circuit, consult local electrical codes: most jurisdictions require a permit for new wiring, and some mandate licensed electrician involvement. According to the design experts at Houzz, planning the electrical layout during a kitchen remodel saves costly retrofitting later.
Cable management is critical for plug-in systems. Run power cords along the back edge of the countertop where they meet the wall, or drill a discreet hole through the back of a cabinet to hide the transformer inside. Use cable clips or adhesive-backed channels to keep cords tidy and out of sight.
If you’re lighting cabinets that don’t reach the ceiling, consider adding fixtures on top of the cabinets as well. This creates indirect ambient lighting that washes the ceiling and makes the kitchen feel larger. Designers at Remodelista often recommend layering under cabinet and upper ambient lighting for a balanced lighting scheme.
For kitchens with open shelving, angle fixtures slightly upward to highlight displayed items without blinding anyone at eye level. Use dimmers or smart controls to dial in the perfect brightness, what works for cooking may feel too harsh during a casual dinner.
Don’t forget wall switches or motion sensors. Relying on tiny fixture-mounted switches is inconvenient. Hardwired systems should integrate with a standard wall switch, while plug-in setups benefit from smart plugs or wireless remotes.
Safety note: Always wear safety glasses when drilling mounting holes overhead, and use gloves when handling sharp-edged aluminum channels. If working with hardwired fixtures, treat every wire as live until tested.
Conclusion
Choosing the right under cabinet lighting depends on your kitchen layout, budget, and how much control you want over brightness and color. LED strips offer maximum flexibility, puck lights provide targeted task illumination, linear bars deliver seamless coverage, and smart systems add convenience for tech-savvy households. No matter which route you take, proper placement and installation make all the difference between lighting that works and lighting that wows.


