
Good kitchen lighting isn’t about one overhead fixture doing all the heavy lifting. It’s about layering light where you actually work, showcasing what you want to see, and making the space functional after dark. Cabinet lighting does exactly that, it fills in shadows under wall cabinets, highlights glassware or collectibles inside them, and even adds ambient glow along the ceiling line. Whether you’re prepping dinner, hunting for that one spice jar, or just want your kitchen to feel less cave-like at night, the right cabinet lighting makes a measurable difference. This guide walks through the types, selection criteria, and installation basics so you can tackle the project with confidence.
Table of Contents
ToggleKey Takeaways
- Kitchen cabinet lighting eliminates work shadows, adds depth and dimension, and improves safety by better illuminating food prep zones where knives and stovetops are involved.
- Under-cabinet LED strip lights are preferred for task lighting over puck lights because they provide continuous, even illumination without dark gaps between fixtures.
- Proper brightness for under-cabinet task lighting requires 150–250 lumens per linear foot of counter; measure your cabinet runs and plan layout in 6-inch increments to avoid awkward gaps.
- Choose a warm white color temperature (2700K–3000K) for residential kitchens as it flatters skin tones and food, while selecting LEDs with CRI 90+ to ensure accurate color rendering.
- Cabinet lighting installation takes 2–4 hours for DIY projects; prioritize surface prep, test lighting before final mounting, and use LED-compatible dimmers rather than standard incandescent models for smooth dimming.
- Interior cabinet lighting with motion sensors or door switches turns glass-front cabinets and pantries into attractive focal points while automating light activation when doors open or close.
Why Kitchen Cabinet Lighting Matters
Task lighting under cabinets eliminates the shadow your body casts on the counter when overhead lights are your only source. That shadow zone is exactly where you chop, measure, and read recipes, so it’s not just aesthetic, it’s practical.
Cabinet lighting also adds depth and dimension. A kitchen lit only from above can feel flat and institutional. Layering light at different heights (overhead, under-cabinet, inside-cabinet, above-cabinet) creates visual interest and makes the room feel larger.
From a safety standpoint, better visibility reduces knife slips and stovetop accidents. And if you’re planning to sell, upgraded lighting solutions are a relatively low-cost improvement that buyers notice during evening showings.
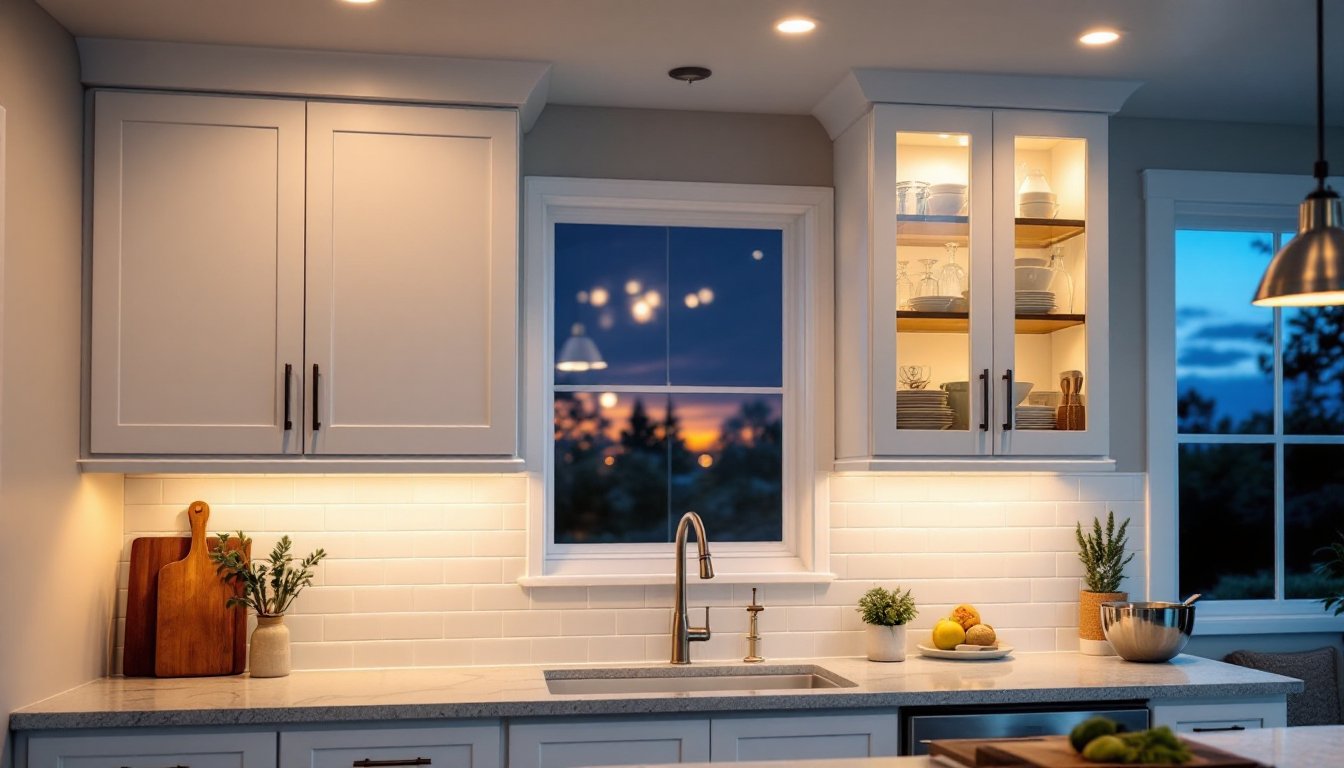
Finally, cabinet lighting can showcase your investment. If you’ve got glass-front cabinets or open shelving with nice dishware, interior lighting turns that into a focal point instead of a dust collector in the dark.
Types of Kitchen Cabinet Lighting
Under Cabinet Lighting
This is the workhorse of kitchen cabinet lighting. Mounted to the underside of wall cabinets, it directs light down onto countertops and backsplashes.
Puck lights are small, round fixtures (usually 2–3 inches in diameter) spaced every 8–12 inches. They create distinct pools of light, which works well for highlighting specific prep zones but can leave dark gaps between fixtures. Available in LED, halogen, and xenon versions: LED is the most energy-efficient and runs coolest.
Linear strip lights (also called tape lights or bar lights) provide continuous, even illumination with no dark spots. LED strip lights come on adhesive-backed rolls in various color temperatures (2700K warm white to 5000K daylight). Bar-style fixtures are rigid aluminum channels with integrated LEDs, more durable than tape, easier to install uniformly, and often dimmable. According to practical kitchen lighting guides, linear fixtures are preferred for task lighting because they eliminate the striping effect.
Hardwired vs. plug-in: Hardwired systems look cleaner (no visible cords) but require basic electrical knowledge or a licensed electrician if you’re not comfortable working with 120V circuits. Plug-in versions use a transformer and plug into an existing outlet: they’re faster to install and can often be relocated.
Low-voltage (12V or 24V) systems require a transformer but are safer to work with and easier to dim. 120V (line-voltage) systems are simpler but generate more heat and may require a compatible dimmer.
When mounting, position fixtures toward the front edge of the cabinet, not the back wall. This minimizes glare on glossy backsplashes and directs light where you need it.
Inside Cabinet Lighting
Interior cabinet lights are for display, not task work. They’re ideal for glass-front cabinets, open shelving, or even deep pantries where you’re tired of playing flashlight-tag with canned goods.
LED puck lights or small strip segments work well here. Battery-powered pucks are the easiest retrofit, stick them to the cabinet ceiling, replace CR2032 batteries every few months, done. But if you’re installing new cabinets or doing a remodel, hardwired or low-voltage LED strips integrated into shelving offer a cleaner, maintenance-free look.
Motion-sensor or door-switch activation is common for pantry cabinets. The light turns on when the door opens, off when it closes. This requires a small switch mortised into the cabinet frame (similar to a refrigerator door switch) and low-voltage wiring.
Color temperature matters for display. 2700K–3000K warm white flatters wood, ceramics, and glassware. Anything above 4000K can make dishware look sterile.
Above Cabinet Lighting
This is accent or ambient lighting, not task lighting. Strip LEDs placed on top of wall cabinets wash the ceiling and soffit area with indirect light, adding a soft glow that makes the kitchen feel more open, especially if you have 8-foot ceilings.
LED rope light or flexible strip light is the go-to here. Run it along the back edge of the cabinet top (against the wall) so the light bounces off the ceiling. If you run it along the front edge, you’ll see the individual diodes reflected in the ceiling, not a good look.
This type of decorative lighting is often used on a separate switch or dimmer so you can use it as mood lighting when you don’t need full task illumination. It also highlights crown molding if your cabinets have it.
Be aware: if the tops of your cabinets are dusty or haven’t been cleaned in a while, above-cabinet lighting will put that on display. Clean first.
Choosing the Right Lighting for Your Cabinets
Start with color temperature. Measured in Kelvin (K), it affects how your kitchen feels and how colors look. 2700K–3000K (warm white) is the standard for residential kitchens, it’s cozy, flatters skin tones, and makes food look appetizing. 3500K–4000K (neutral white) is brighter and crisper, good for modern or commercial-style kitchens. 5000K+ (daylight) is harsh for most homes unless you’re doing detail work like decorating cakes or color-matching paint.
Next, consider brightness. Under-cabinet task lighting should deliver 150–250 lumens per linear foot of counter. A 3-foot section of counter needs roughly 450–750 lumens total. LED strip specs will list lumens per foot or per reel (typically 16 feet): do the math before you buy.
Dimmability is worth paying for. Kitchens serve multiple functions, meal prep, assignments, entertaining, and you don’t always need full brightness. Make sure your LED driver or transformer is dimmable, and pair it with a compatible dimmer switch. Not all LEDs dim smoothly: cheap ones flicker or drop out at low levels. Look for fixtures rated for 10% dimming or lower.
CRI (Color Rendering Index) measures how accurately colors appear under the light. A CRI of 90+ is ideal for kitchens: anything below 80 can make reds look muddy and whites look sallow. Most quality LED lights will specify CRI on the packaging.
Power source: Battery-powered is easiest but requires ongoing maintenance. Plug-in works if you have an accessible outlet and don’t mind a visible cord. Hardwired or low-voltage is the most permanent and professional-looking, but involves more upfront work.
Control options: Basic on/off switches are fine, but consider motion sensors, timers, or smart home integration if you want automation. Some LED systems now work with Alexa, Google Home, or smartphone apps for scheduling and dimming.
Finally, match the fixture length to your cabinet runs. Most puck lights and LED bars come in 6-inch increments (12″, 18″, 24″, 36″, etc.). Measure your cabinets and plan your layout so you’re not left with awkward gaps or too much overhang.
Installation Tips for DIY Success
Safety first: If you’re working with 120V hardwired lighting, turn off the circuit breaker and verify power is off with a non-contact voltage tester. Wear safety glasses and work gloves, especially when drilling into cabinets or drywall.
Prep the surface. Cabinet undersides should be clean, dry, and dust-free before applying adhesive-backed LED strips. Wipe with isopropyl alcohol and let dry. If the cabinet is unfinished or rough, consider applying a strip of painter’s tape first, then the LED backing sticks to that. Some installers use small wire staples or aluminum mounting channels for a more secure hold than peel-and-stick alone.
Plan your wire routing. For plug-in systems, figure out where the transformer will go and how you’ll conceal the cord. Tuck it behind the cabinet side panel, run it through the back of a cabinet, or use a lighting accessory like cord covers or raceways along the underside of the cabinet. For hardwired systems, you’ll need to fish wire through the cabinet or wall: this may involve drilling small holes in cabinet sides or running conduit.
Make the connections. Most LED strips have solderless connectors or quick-clip ends, but double-check polarity (positive to positive, negative to negative). If you’re cutting LED strips to length, only cut at the marked cut lines, usually every 2–4 inches, indicated by scissors icons and copper pads.
Test before final mounting. Plug in or turn on power and verify each section lights up evenly with no dead spots or flickering. If using a dimmer, test the full range. If there’s an issue, it’s easier to fix before everything is glued down.
Concealment and diffusion. Exposed LED strips create a dotted line of visible diodes. For a cleaner look, install them inside an aluminum channel with a frosted diffuser lens. These channels are sold at home centers in 1-meter lengths, with end caps and mounting clips. The diffuser softens the light and hides the individual LEDs.
Spacing for puck lights: If using pucks, space them 8–12 inches apart for even coverage. Too far apart creates dark rings: too close wastes money and energy. Pucks should be positioned 1–2 inches from the front edge of the cabinet to minimize glare.
Electrical considerations: If hardwiring, you’ll typically tie into an existing switch or add a new one. Some jurisdictions require a permit for new circuits or major lighting modifications, especially if you’re adding a new breaker or junction box. Check local code. If running low-voltage wire, you have more flexibility, low-voltage is generally not code-restricted, but the transformer itself must be accessible and installed per manufacturer instructions.
Dimmer compatibility: Standard incandescent dimmers don’t work well with LEDs. Use a dimmer specifically rated for LED or CFL loads. Lutron, Leviton, and Legrand make reliable models. If you have multiple zones (under-cabinet, inside-cabinet, above-cabinet), consider separate switches so you can control each layer independently.
Final touches: Once installed, step back and check for any visible hot spots or uneven light. Adjust positioning if needed. For inside-cabinet lighting, confirm the sensors or switches activate reliably. For above-cabinet lighting, make sure the LED strip is positioned so you don’t see the individual diodes from standing height.
Most under-cabinet LED installations take 2–4 hours for an average kitchen, depending on complexity and whether you’re hardwiring or using plug-in fixtures. If you’re uncomfortable with electrical work, especially 120V, hire a licensed electrician. The fixtures themselves are DIY-friendly: it’s the wiring that requires care.


