
Pendant lights over a kitchen island aren’t just about function, they’re design anchors that define the whole room. Get them wrong, and you’ve got awkward shadows, bumped heads, or fixtures that look out of scale. Get them right, and you’ve nailed task lighting, ambiance, and style in one shot. Whether you’re remodeling or just swapping outdated fixtures, this guide covers the practical details: choosing a style that fits your space, sizing and spacing for balance, hanging at the correct height, and navigating the electrical work.
Table of Contents
ToggleKey Takeaways
- Pendant lighting for kitchen islands provides focused task lighting, visual definition, and design flexibility that makes islands functional and beautiful.
- Proper sizing follows the formula: island width in inches divided by 3–4 equals ideal pendant diameter; a 48-inch island works best with 12–16 inch pendants.
- Hang pendant lights 30–36 inches from the shade bottom to the countertop, adjusting for ceiling height and sightlines to prevent glare and head bumps.
- Use one pendant per 24–30 inches of island length: single pendants for islands under 48 inches, two for 48–72 inches, and three or more for islands over 72 inches.
- Wire connections, fixture weight ratings, and GFCI compliance are critical during installation; hire a licensed electrician if you’re unsure about electrical work.
- Select pendant styles (modern, farmhouse, industrial, or transitional) that match your kitchen design and materials—finish, shade shape, and scale determine both function and aesthetic impact.
Why Pendant Lights Are Perfect for Kitchen Islands
Kitchen islands pull triple duty, prep zone, dining spot, and social hub. Pendant lights match that versatility better than most fixtures.
Focused task lighting is the main draw. A well-placed pendant casts light directly onto the work surface, cutting shadows whether you’re chopping vegetables or reading a recipe. Unlike recessed cans, which spread light broadly, pendants concentrate it where it’s needed without glare.
Visual definition is the bonus. An island often sits in the middle of an open-plan kitchen or great room. Pendants draw the eye downward, anchoring the island as a distinct zone. They also break up the ceiling plane in rooms with high or vaulted ceilings, adding human scale.
Design flexibility sets pendants apart from flush-mount or track lighting. You can pick finish, shape, material, and light output independently. Need dimmable warmth for dinner? Install pendants with compatible LEDs and a dimmer switch. Want a statement piece? Go bold with oversized glass or industrial metal shades.
One practical note: pendants work best over islands with at least 36 inches of clearance on the approach sides. Narrow galleys or cramped layouts may benefit more from flush-mount options that don’t intrude into walkways.
How to Choose the Right Pendant Style for Your Kitchen
Style choice isn’t just aesthetic, it affects light distribution, maintenance, and how the fixture integrates with cabinetry and countertops.
Shade shape governs light direction. Open or cage-style pendants throw light in all directions, which works in kitchens with light-colored walls and ceilings that reflect well. Drum or bowl shades with opaque sides focus light downward, ideal for dark countertops that need concentrated illumination. Clear glass pendants show the bulb, so choose LED bulbs with a warm color temperature (2700K–3000K) and a visible filament if you want vintage charm.
Material and finish should echo existing hardware. If your cabinet pulls are brushed nickel, matching pendant hardware ties the room together. Mixed metals can work, say, black pendants with brass accents, but keep it intentional. Glass is easy to clean but shows smudges: metal hides fingerprints but may dent if bumped during installation.
Scale and visual weight matter more than most DIYers realize. A single oversized pendant (18–24 inches diameter) can anchor a small island, but three smaller pendants (8–12 inches) may look more balanced over a longer span. Solid, opaque shades feel heavier visually: airy wireframes or clear glass feel lighter.
Matching Pendants to Your Kitchen Design Theme
Modern/Contemporary: Look for clean lines, geometric shapes, and finishes like polished chrome, matte black, or brushed stainless. Minimalist drum pendants or linear cluster fixtures suit this aesthetic. Avoid ornate details.
Farmhouse/Rustic: Barn-style shades, Edison bulbs, and distressed finishes work here. Inspiration from farmhouse lighting includes metal shades in galvanized steel or oil-rubbed bronze. Wood bead or wire-basket pendants add texture.
Industrial: Exposed bulbs, metal cages, and utilitarian shapes define this look. Industrial cage lights in black or aged brass pair well with concrete countertops and open shelving. Adjustable-height pendants on pulley systems add authentic warehouse vibes.
Traditional: Crystal, blown glass, or fabric drum shades with decorative trim fit classic kitchens. Finishes lean toward oil-rubbed bronze, antique brass, or polished nickel. For vintage character, consider fixtures inspired by antique lighting designs.
Transitional: This hybrid style blends modern simplicity with traditional warmth. Think simple drum shades in linen or frosted glass with understated metal accents. Neutral tones and symmetrical layouts dominate.
Sizing and Spacing: Getting the Proportions Right
Undersized pendants vanish over a large island: oversized ones crowd the space and create head-knock hazards. Proportion requires math and a measuring tape.
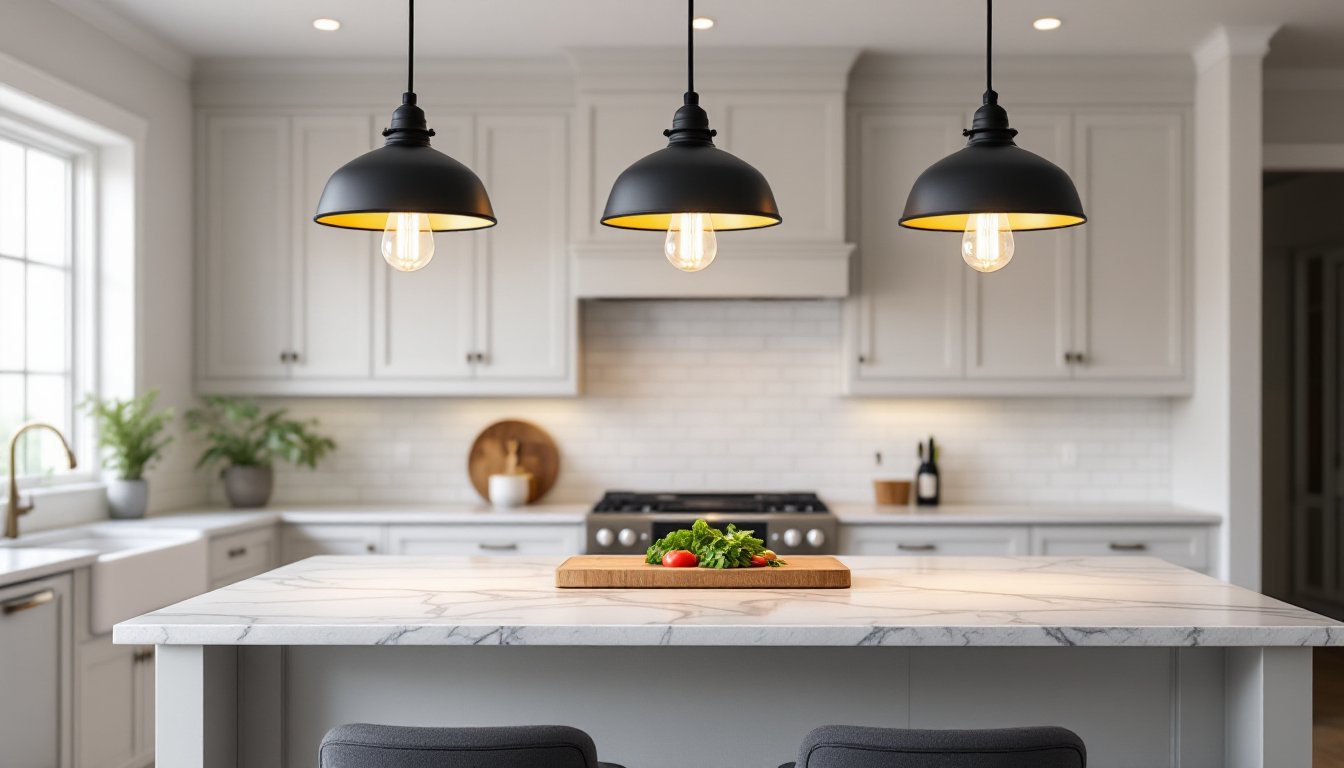
Pendant diameter should relate to island width. A common formula: island width (in inches) divided by 3 to 4 equals appropriate pendant diameter. For example, a 48-inch-wide island suggests pendants in the 12–16 inch range. If using multiple smaller pendants, you can go slightly smaller per fixture since the cluster creates visual mass.
Island length dictates spacing. Divide the island length into equal sections based on the number of pendants, then center each fixture in its section. For a 72-inch island with three pendants, divide into three 24-inch sections and hang each pendant 12 inches from its section edge, that puts them 24 inches apart, center to center.
Overhang and edge clearance matter for safety. Leave at least 6 inches of clearance from the pendant’s widest point to the island edge. This prevents shoulder bumps when someone leans over the counter.
Ceiling height affects perceived scale. In kitchens with 8-foot ceilings, pendants of 8–12 inches in diameter keep things proportional. 10-foot or higher ceilings can handle 14–20 inch pendants without overwhelming the space. Vaulted or cathedral ceilings often look best with adjustable-height fixtures or extra-long downrods.
How Many Pendants Do You Need?
Rule of thumb: one pendant per 24–30 inches of island length, but context matters.
- Islands under 48 inches long: One centered pendant usually suffices, especially if it’s 14+ inches in diameter.
- Islands 48–72 inches long: Two pendants spaced evenly provide balanced light and symmetry.
- Islands over 72 inches long: Three or more pendants prevent dark gaps. Some designers prefer odd numbers for visual rhythm.
Avoid single pendants on long islands. A lone fixture over a 96-inch island leaves the ends in shadow and looks lopsided. If budget is tight, consider a linear pendant or multi-light track fixture that spans the length.
Adjustments for task zones: If one end of the island is dedicated to prep and the other to seating, you might cluster pendants over the work zone and space them farther apart over the dining side. Match light output accordingly, higher lumens for tasks, softer for ambiance.
Proper Height and Placement for Kitchen Island Pendants
Hang too high and you lose task lighting: too low and tall family members will duck or smack their heads. The sweet spot is surprisingly narrow.
Standard hanging height is 30–36 inches from the bottom of the pendant shade to the island countertop. This range works for most ceiling heights and pendant styles. For islands used primarily for prep, lean toward 30–32 inches to maximize light on the work surface. If the island doubles as a dining or bar-height counter, 34–36 inches preserves sightlines across the table.
Ceiling height adjustments: In rooms with ceilings above 9 feet, add 3 inches of drop for every additional foot of ceiling height. So a 10-foot ceiling might warrant 33–39 inches of clearance. This keeps the fixtures visually balanced without floating too high.
Measurement tip: Use a tape measure and painter’s tape to mock up the bottom edge of the pendant before cutting or drilling. Stand at the island, sit if you’ll use stools, and check the sightline. Can you see across comfortably? Is the light hitting the counter, not your eyes?
Chain or downrod length is adjustable on most pendants. If the included rod is too short (common in homes with high ceilings), order an extension rod in the same finish. Many manufacturers sell these separately, or you can buy compatible rods from lighting accessory suppliers. If the rod is too long, you can shorten chain links or cut metal rod with a hacksaw, but keep at least 6 inches inside the canopy for secure mounting.
Dimmer placement: Install the dimmer switch at a height and location that’s easy to reach while standing at the island. 48 inches from the floor to the center of the switch box is standard and ADA-compliant.
Avoid glare: If you can see the bare bulb when standing at the island, you’ll get glare. Choose pendants with diffusers, frosted glass, or downward-facing shades. When in doubt, use a lower-wattage bulb or dimmer control.
Installation Tips and Electrical Considerations
Pendant installation isn’t rocket science, but it does involve live wiring. If you’re comfortable with basic electrical work and your local code allows homeowner wiring, this is a manageable weekend project. If not, hire a licensed electrician.
Check existing wiring and junction boxes. Most pendant lights weigh under 10 pounds, which a standard ceiling box can handle if it’s properly fastened to a joist or blocking. Heavier fixtures (metal or glass over 10 lbs) require a fan-rated or heavy-duty box secured with screws into framing, not just drywall anchors. Open the existing box and confirm it’s nailed or screwed to solid wood. If it wobbles or is a retrofit “old work” box in drywall, reinforce or replace it.
Turn off power at the breaker, not just the wall switch. Use a non-contact voltage tester to confirm the circuit is dead before touching any wires. Kitchen circuits often share a breaker with outlets, so double-check.
Wire connections follow standard practice: black (hot) to black, white (neutral) to white, and bare copper or green (ground) to the box ground screw or green wire. Use wire nuts rated for the gauge you’re working with (typically 14 AWG or 12 AWG in kitchens). Twist wires clockwise, then thread the nut on until snug. Tug gently, if a wire pulls out, redo the connection.
Mounting the canopy and adjusting drop: Thread the pendant wires through the canopy and downrod or chain before connecting to the ceiling box. Once wired and capped, tuck everything into the box neatly and secure the canopy with the provided screws or mounting plate. If using chain, adjust links to achieve your target height. Excess chain can be coiled inside the canopy if there’s room, or removed with needle-nose pliers.
Bulb selection and wattage limits: Check the fixture label for maximum wattage. Most modern pendants are rated for 60W incandescent equivalent or specify LED-compatible. LEDs are the practical choice, lower heat, longer life (15,000–25,000 hours), and better energy efficiency. A 9–12W LED produces the same light as a 60W incandescent. Avoid exceeding wattage limits: it’s a fire hazard.
Dimmer compatibility: Not all LEDs dim smoothly. If you’re installing a dimmer, buy bulbs labeled “dimmable” and pair them with an LED-compatible dimmer switch. Older incandescent dimmers can cause LED flicker or buzzing. Lutron and Leviton make reliable models: expect to spend $15–30 per switch.
Permits and code compliance: In many jurisdictions, adding or relocating a light fixture requires a permit, especially if you’re running new wire or adding a circuit. Check with your local building department. The National Electrical Code (NEC) requires GFCI protection for outlets within 6 feet of a sink, but pendant lights typically don’t trigger that rule unless installed directly above wet areas (not common over islands). If in doubt, consult a pro.
Installing multiple pendants on one switch: You can wire two or three pendants in parallel off a single ceiling box if the box and circuit can handle the combined load. Junction boxes are rated for a certain number of conductors and cubic inches of wire fill, don’t overstuff. If your island is long and requires pendants spaced far apart, you may need multiple ceiling boxes. That’s new rough-in work: cutting drywall, running 14/2 or 12/2 NM cable through the ceiling joists, and patching. Budget a full day or hire help.
Tool checklist: Wire stripper, non-contact voltage tester, screwdrivers (flathead and Phillips), needle-nose pliers, ladder or step stool, wire nuts, electrical tape, and a hacksaw if you need to shorten downrods. Safety glasses and work gloves are non-negotiable.
Final step: Once installed, turn the breaker back on and test. Flip the switch, check for flicker or buzzing, and confirm the dimmer works smoothly through its range. Stand at the island and verify light coverage. Adjust bulb wattage or shade position if needed, some pendants have adjustable sockets.
Pendant installation is straightforward if you respect the electrical basics and take your time with measurements. The result, focused task light, elevated design, and a kitchen island that actually feels finished, makes the effort worthwhile. For more inspiration and real-world examples, browsing galleries like Houzz’s pendant light collection or curated picks from Remodelista can help narrow your style choices before you buy.


