
Most homeowners spend thousands on landscaping, then watch it disappear into darkness every night. A landscape lighting kit changes that equation entirely. These plug-and-play systems bring professional-grade outdoor illumination within reach of weekend DIYers, boosting curb appeal, security, and nighttime usability without hiring an electrician or pulling permits. Whether highlighting a prized Japanese maple or simply making the front walkway safer after dark, the right kit delivers results in a single afternoon.
Table of Contents
ToggleKey Takeaways
- A landscape lighting kit bundles everything needed for professional-grade outdoor illumination—fixtures, transformers or solar panels, wiring, and hardware—allowing homeowners to install systems in a single afternoon without hiring an electrician.
- Low-voltage kits offer consistent brightness and reliable performance, while solar landscape lighting kits provide zero operating costs and require no wiring, making them ideal for remote areas despite weather-dependent performance.
- Proper placement following a layered approach (ambient, task, and accent lighting) with attention to beam angle, lumens, and color temperature (2700–3000K for warm, inviting residential spaces) creates dramatic visual depth and maximizes curb appeal.
- LED fixtures dominate the market with 25,000–50,000 hour lifespans and 85% lower energy consumption than halogen alternatives, reducing both maintenance hassles and operating costs.
- Essential maintenance includes twice-yearly lens inspections for dirt and debris, annual connection checks for corrosion, and adjusting fixtures as plants grow to maintain optimal lighting performance year-round.
- Choose expandable landscape lighting kits with standard quick-connect or twist-lock fittings rather than proprietary connectors to ensure flexibility for future system upgrades and third-party fixture compatibility.
What Is a Landscape Lighting Kit and Why You Need One
A landscape lighting kit bundles everything needed to light outdoor spaces: fixtures, transformer or solar panels, wiring or stakes, and mounting hardware. Unlike piecemeal systems that require matching voltage, connector types, and fixture styles, kits ensure compatibility out of the box.
Most residential kits operate on low voltage (12V) or solar power, eliminating the need for an electrician or electrical permit in most jurisdictions. They’re designed for homeowner installation, with quick-connect wiring and ground stakes that press into soil or mulch.
The practical benefits stack up quickly. Properly placed lighting reduces trip hazards on steps and uneven paths, deters prowlers by eliminating dark corners, and extends the usable hours of patios and decks. Property value studies consistently show that quality outdoor track lighting and landscape illumination increase home resale appeal, particularly in markets where outdoor living spaces command a premium.
Beyond function, lighting transforms the visual hierarchy of a yard. Without it, even a meticulously designed landscape reads as flat black after sunset. Strategic illumination creates depth, highlights focal points, and draws the eye through the space, turning a passive daytime feature into an active nighttime asset.
Types of Landscape Lighting Kits for Different Outdoor Needs
Kits vary widely in fixture count, power source, and intended use. Pathway kits typically include 6–10 low-profile stake lights designed to line walkways and driveways. Spotlight kits bundle 4–6 adjustable fixtures for uplighting trees, architectural features, or flagpoles. Deck and step kits offer flush-mount or recessed lights to illuminate horizontal surfaces and vertical risers.
Most kits ship with either incandescent, halogen, or LED bulbs. LEDs dominate the current market due to their 25,000–50,000 hour lifespans and minimal heat output. A 3-watt LED produces roughly the same lumens as a 20-watt halogen, translating to 85% lower energy consumption. For ongoing costs and bulb replacement hassle, LED lights offer a clear advantage.
Fixture materials matter for longevity. Cast aluminum and brass resist corrosion in wet climates: powder-coated steel works well in dry regions but may pit in coastal or high-humidity areas. Plastic housings keep costs down but crack under UV exposure and freeze-thaw cycles.
Low Voltage vs. Solar Landscape Lighting Kits
Low-voltage kits run on 12V AC power supplied by a plug-in transformer. The transformer steps down standard 120V household current, making the system safe to install without an electrical license in most areas. Wire runs typically max out at 100 feet from the transformer to avoid voltage drop, which dims fixtures at the end of the line. Use 12-gauge or 14-gauge direct-burial cable rated for wet locations.
Pros: Consistent brightness regardless of weather, supports higher wattage fixtures, reliable timer and photocell control.
Cons: Requires a GFCI-protected outdoor outlet, visible wire runs unless buried, adds to electric bill (though minimally with LEDs).
Solar kits use photovoltaic panels mounted on each fixture or a central panel wired to multiple lights. Rechargeable batteries store daytime energy for nighttime use. Quality varies dramatically: premium kits use monocrystalline panels and lithium batteries, while budget options rely on polycrystalline panels and NiMH cells that degrade quickly. According to recent reviews from Tom’s Guide, even mid-priced solar options now deliver 6–8 hours of usable light after a full charge.
Pros: Zero operating cost, no wiring, relocatable, ideal for remote areas without power access.
Cons: Performance depends on sun exposure (shaded yards struggle), shorter fixture lifespan, dimmer output than low-voltage equivalents, batteries need replacement every 2–3 years.
Key Features to Look for When Choosing a Landscape Lighting Kit
Start with total lumens and beam angle. Pathway lights typically need 50–100 lumens per fixture with a 120° spread for even ground coverage. Spotlights require 200–400 lumens and a 15–40° beam to punch light up into tree canopies or across facades without spill.
Transformer capacity matters for low-voltage systems. Calculate total wattage of all fixtures, then choose a transformer rated at least 25% higher to avoid overload and allow for future expansion. A 150-watt transformer comfortably handles twelve 10-watt fixtures. Look for models with built-in timers, photocells, and multiple voltage taps (12V, 13V, 14V, 15V) to compensate for voltage drop on long runs.
Weather resistance is non-negotiable. Fixtures should carry a minimum IP65 rating (dust-tight and protected against water jets). For in-ground or underwater applications, IP67 or IP68 is required. Gaskets, O-rings, and sealed cable connectors prevent moisture intrusion that corrodes connections and shorts circuits.
Check for adjustable mounting options. Stake-mount fixtures work in planting beds and lawns. Surface-mount bases fit decks and hardscape. Adjustable necks and rotating heads let you fine-tune aim after installation, which is critical when lighting irregular tree trunks or angled walls.
Finally, consider expandability and compatibility. Some manufacturers use proprietary connectors that lock you into their ecosystem: others use standard quick-connect or twist-lock fittings that accept third-party fixtures. If you plan to grow the system over time, open standards provide flexibility.
Step-by-Step Guide to Installing Your Landscape Lighting Kit
Before breaking ground, map your layout. Use stakes and string to mark fixture locations, then walk the route at dusk to visualize sight lines and shadows. Avoid placing lights where they’ll shine into windows or create glare on driveways. Understanding lighting solutions for different outdoor zones helps prioritize placement.
For low-voltage kits:
-
Mount the transformer within 2 feet of a GFCI-protected outdoor outlet, ideally under an eave or in a weatherproof box. Transformers generate heat: ensure 3 inches of clearance on all sides.
-
Lay out the cable along the planned route without burying it yet. Use a single main line (home run) from the transformer, branching to fixtures with T-connectors or daisy-chaining if the kit supports it. Keep wire runs under 100 feet to prevent voltage drop.
-
Connect fixtures using the kit’s quick-connect or screw terminals. Strip 1/2 inch of insulation from the main cable, insert into the connector, and tighten. Most systems use a piercing connector that punctures the cable jacket, no stripping required.
-
Test the system before burying. Power on the transformer, check that all fixtures illuminate evenly, and adjust aim. Dim or flickering lights at the end of the run signal voltage drop: move those fixtures closer or upgrade to heavier-gauge wire.
-
Bury the cable 6–8 inches deep using a flat spade or edging tool. Route under mulch, along fence lines, or behind planting beds to hide the wire. Avoid areas where you’ll be digging regularly. Leave a small service loop (6–12 inches of slack) at each fixture for future adjustments.
-
Set the timer or photocell. Most transformers offer dusk-to-dawn operation or programmable schedules. A 4-hour evening timer conserves energy while covering peak outdoor use.
For solar kits:
-
Assess sun exposure for each fixture location. Panels need 6–8 hours of direct sun daily for full charge: partial shade reduces performance by 40–60%.
-
Assemble and stake fixtures per manufacturer instructions. Push stakes firmly into soil: loose mounts tilt over time.
-
Adjust panel angle to face south (in the Northern Hemisphere) at a 30–45° tilt for optimal year-round charging.
-
Allow 2–3 sunny days for batteries to reach full charge before evaluating brightness.
Safety note: Always wear gloves and safety glasses when handling stakes and wire. Call 811 before digging to mark underground utilities. Even low-voltage systems can short and cause tripping hazards if installed carelessly.
Design Ideas and Placement Tips for Maximum Impact
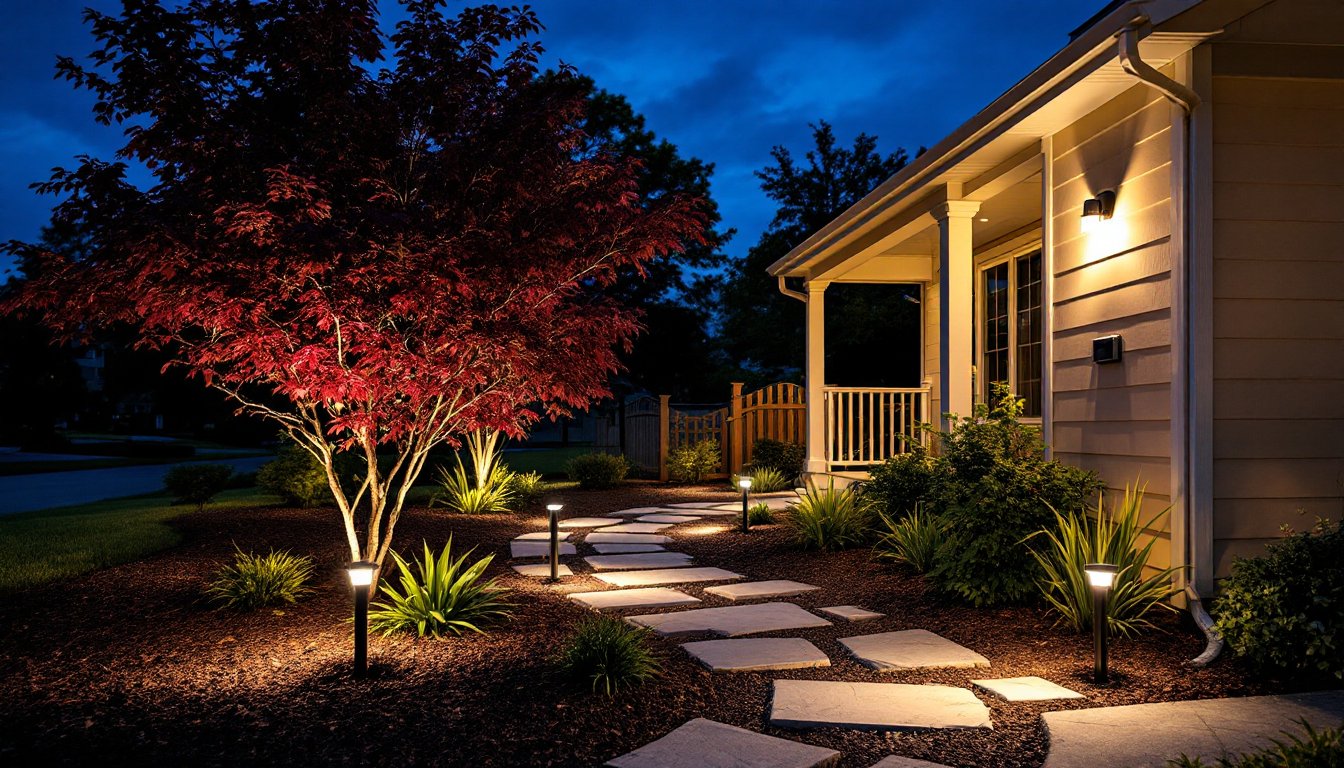
Effective landscape lighting follows a layered approach: ambient, task, and accent. Ambient fixtures (like pathway lights) provide general visibility. Task lighting illuminates functional areas, steps, gates, grills. Accent lights spotlight features worth seeing: specimen trees, water features, textured stonework.
Uplighting transforms trees and shrubs. Place a spotlight 12–24 inches from the trunk, aimed up at a 45° angle. For multi-trunk trees, use two fixtures to create depth and avoid a flat, poster-like effect. Avoid lighting the entire canopy: focus on trunks and lower branches, letting foliage fade into darkness above.
Path lighting should illuminate the ground, not the viewer’s eyes. Position fixtures 8–10 feet apart on alternating sides of the walk for even coverage without a runway effect. Keep fixtures low (12–18 inches tall) to minimize glare. Many designers integrate decorative lighting elements that double as focal points during the day.
Wall washing uses fixtures placed 12–18 inches from a facade, aimed parallel to the surface. This technique highlights texture on stone, brick, or stucco and makes the structure appear larger. For smooth siding, consider grazing (extreme angle) instead to reveal subtle surface detail.
Silhouetting places a fixture behind an object, casting its shadow onto a wall or fence. Works beautifully with ornamental grasses, sculptures, or architectural salvage. Position the light low and close to the background surface for crisp shadow definition.
Avoid over-lighting. More fixtures don’t always equal better results. Contrast creates drama: if everything is lit equally, nothing stands out. Leave some areas dark to frame the illuminated features. As Gardenista often notes, restraint in landscape design, including lighting, produces more sophisticated outcomes than saturation.
Color temperature affects mood. Warm white (2700–3000K) mimics incandescent bulbs and feels inviting: it’s the standard for residential landscapes. Neutral white (3500–4000K) offers better color rendering for flowering plants. Cool white (5000K+) reads as harsh and commercial: avoid it in home settings.
For decks and patios, consider using lighting accessories like dimmers or smart controls to adjust brightness for different activities, full output for grilling, low glow for conversation.
Maintenance and Troubleshooting Your Landscape Lighting System
Landscape lights require minimal upkeep, but neglect leads to early failure. Twice a year, inspect fixtures for dirt, spider webs, and debris inside lenses, all reduce light output. Remove the lens or shield, wipe with a damp cloth, and check the gasket for cracks. Replace any gasket that feels brittle: moisture intrusion is the leading cause of fixture failure.
Check connections annually. Corrosion builds up on terminals, increasing resistance and generating heat. Disconnect quick-connects, spray with electrical contact cleaner, and reconnect. For screw terminals, loosen, clean, and retighten. Corroded connectors should be replaced, not just cleaned.
LED fixtures rarely need bulb replacement, but if one dims prematurely, the driver (internal power supply) may have failed. Drivers are often replaceable: check the manufacturer’s parts availability before discarding the entire fixture. Smart home enthusiasts exploring home lighting automation should verify that replacement drivers maintain dimming compatibility.
Troubleshooting common issues:
-
No lights at all: Check the transformer’s GFCI outlet, reset if tripped. Verify the timer hasn’t switched off accidentally. Test the transformer output with a multimeter (should read 10–15V AC depending on tap setting).
-
Lights dim over time: Voltage drop. Either shorten the wire run, use heavier-gauge cable, or increase the transformer’s voltage tap.
-
One or two lights out: Loose connection at the fixture or a failed bulb/LED. Bypass the fixture to check if others downstream come on: if they do, the fixture is bad.
-
Lights flicker: Loose connection, water in a junction, or loose transformer mounting vibrating the connection.
-
Solar lights won’t charge: Clean the panel with glass cleaner and a microfiber cloth. If performance doesn’t improve, the battery may be dead. Most solar fixtures use AA or 18650 rechargeable cells: replacement is straightforward.
Landscape changes affect lighting. Mulching, soil settling, or plant growth can bury or obscure fixtures. Adjust stakes and trim foliage annually. Trees grow: a spotlight aimed perfectly at a sapling’s trunk may miss entirely three years later.
Winter prep: In cold climates, low-voltage systems can remain installed year-round, but solar fixtures should be brought indoors to protect batteries from freeze damage. Leave the transformer plugged in: most include cold-weather protection. Covered fixtures under snow won’t light anything anyway, and most timers can be paused until spring.
For those who want to refine their approach season to season, experimenting with a lighting layout tool can help visualize changes before physically moving fixtures, especially useful when redesigning plant beds or adding hardscape features.


