
Brass landscape lighting sits at the intersection of durability and design, a material choice that only gets better with age. Unlike aluminum or plastic fixtures that fade and crack, brass develops a natural patina that adds character to your yard while standing up to weather, corrosion, and decades of use. Whether lighting a stone walkway, highlighting specimen trees, or adding security near entryways, brass fixtures deliver warm, reliable illumination that complements both historic and contemporary architecture. This guide walks through selecting, planning, installing, and maintaining brass landscape lighting systems for homeowners ready to upgrade their outdoor spaces.
Table of Contents
ToggleKey Takeaways
- Brass landscape lighting resists corrosion naturally and develops a graceful patina over time, making it superior to aluminum or plastic fixtures that fade and crack in outdoor conditions.
- Brass fixtures offer distinct advantages including efficient heat dissipation that extends bulb life, structural stability that prevents tipping, and aesthetic appeal that complements both historic and contemporary architecture.
- Proper planning requires identifying safety priorities, selecting three to five focal points, calculating total wattage, and sizing transformers at 120–150% of total fixture load to prevent voltage drop and dimming on longer cable runs.
- Low-voltage brass landscape lighting installation is a DIY-friendly project that requires routing cable 6–12 inches deep depending on traffic, using waterproof connections, and testing the full circuit before backfilling trenches.
- Brass landscape lighting maintenance is minimal: clean lenses every three to six months, inspect connections annually for corrosion, and allow the natural patina to develop as a self-protecting finish that reduces the need for frequent polishing.
Why Choose Brass for Your Landscape Lighting
Brass fixtures offer distinct advantages over cheaper alternatives, especially for permanent landscape installations. The material resists corrosion naturally, no powder coating or finish required to protect the substrate. Saltwater climates, acidic soil conditions, and constant moisture exposure don’t compromise structural integrity the way they do with steel or aluminum.
The thermal properties of brass also matter. The material dissipates heat efficiently, which extends bulb life in LED and halogen fixtures. This becomes critical in enclosed well lights or fixtures buried in mulch where heat buildup shortens component lifespan.
Brass’s weight provides stability. Path lights and bollards made from solid brass resist tipping in high winds or when bumped by mowers and foot traffic. Lightweight fixtures often require staking or anchoring: quality brass units stay put once installed.
From an aesthetic standpoint, brass ages gracefully. The patina progression, from bright gold to rich brown to weathered verde, happens naturally over months or years depending on climate. Homeowners who prefer the polished look can maintain it with periodic cleaning, but many choose the low-maintenance patina route that blends fixtures into garden settings. The material’s color temperature also complements warm-toned landscapes: brick, stone, wood fencing, and autumn plantings all pair well with brass hardware.
Types of Brass Landscape Lighting Fixtures
Selecting the right fixture type depends on the lighting task, general illumination, accent lighting, or safety coverage. Each category serves distinct purposes in a cohesive landscape lighting plan.
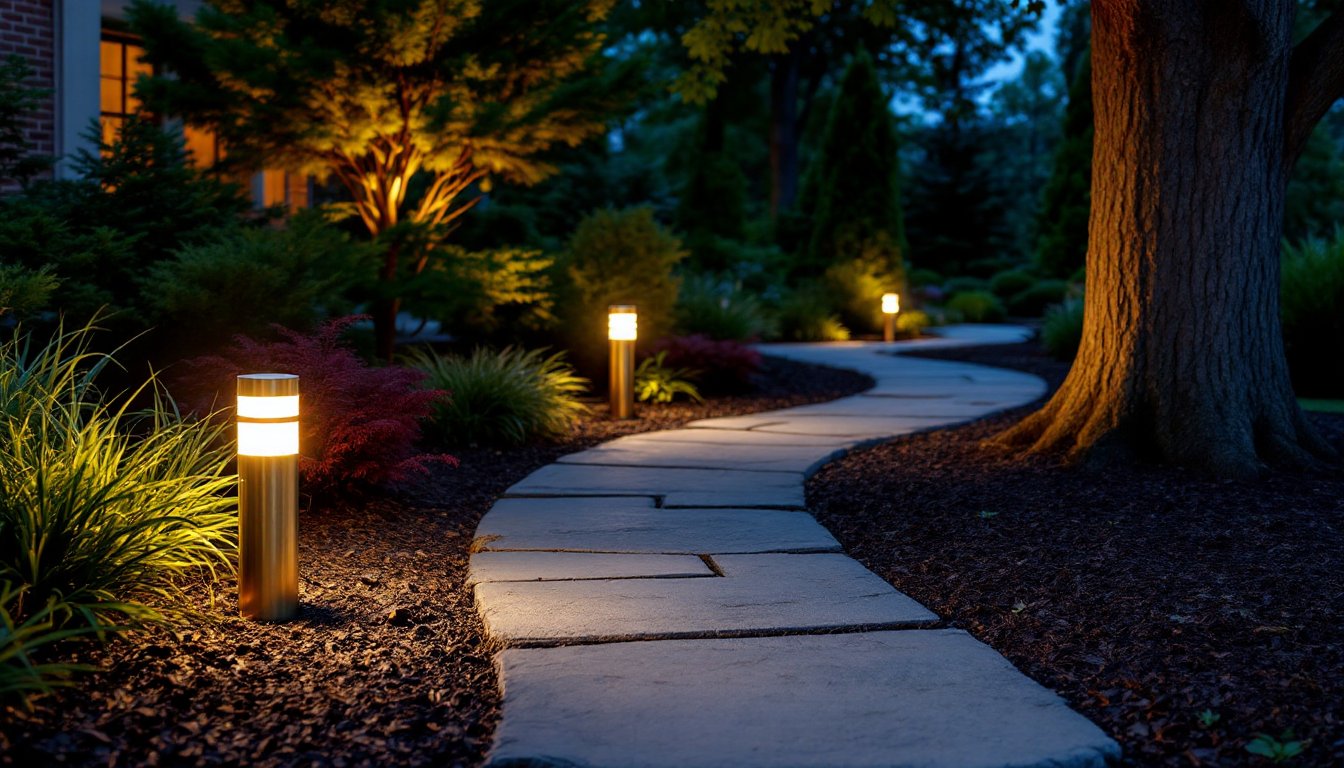
Path Lights and Bollards
Path lights typically stand 18 to 24 inches tall and cast downward pools of light along walkways, driveways, and garden borders. Look for fixtures with frosted or textured lenses to reduce glare, clear lenses create harsh spots that impair night vision. Most brass path lights use 2- to 5-watt LED bulbs or 20-watt halogen equivalents, providing enough illumination for safe navigation without overwhelming plantings.
Bollard lights range from 24 to 42 inches and offer broader coverage for wider paths, patio perimeters, or property boundaries. Taller bollards suit contemporary landscapes, while shorter path lights work better in traditional cottage gardens or along narrow flagstone walks. Verify the fixture uses a replaceable bulb socket, integrated LED units become disposable when the emitter fails, while socketed fixtures accept standard MR16 or G4 bulbs.
Brass path lights should have a sealed lens-to-body gasket rated IP65 or higher to prevent moisture intrusion. Check that the stake or mounting base is also brass or stainless steel: some manufacturers cut costs with zinc or steel stakes that corrode faster than the fixture body.
Spotlights and Well Lights
Spotlights (also called bullet lights or directional fixtures) mount on stakes or hardscape surfaces to uplight trees, architectural features, or walls. Adjustable heads allow beam aiming after installation. Most brass spotlights use 5- to 12-watt LEDs with beam angles from 15 degrees (narrow spot) to 60 degrees (wide flood). Narrow beams work for tall trees or columns: wider beams suit shorter shrubs or textured walls.
When choosing spotlights, confirm the fixture includes a glare shield or snoot, an integrated hood that prevents light spill into windows or neighboring properties. Adjustable fixtures without shields create light pollution and annoy neighbors.
Well lights (in-ground or recessed fixtures) sit flush with grade and direct light upward. They’re ideal for uplighting specimen trees, flagpoles, or statuary. Brass in-ground fixtures with adjustable beam angles give flexibility to adjust as plants mature. Installation requires digging a cylindrical hole, setting the fixture in a gravel-filled pit for drainage, and ensuring the top ring sits level with finished grade.
Well lights take more abuse than above-grade fixtures, mowers, foot traffic, and mulch contact. Cast brass housings with tempered glass lenses handle the wear better than stamped metal or plastic. Verify the fixture has a drainage weep hole in the bottom: without it, condensation pools inside and corrodes the socket.
How to Plan Your Brass Landscape Lighting Layout
Effective landscape lighting starts with a daytime walkthrough and nighttime assessment. Begin by identifying safety priorities: steps, grade changes, path edges, and entry points. These areas need consistent, overlapping coverage, don’t rely on a single fixture for any critical zone.
Next, choose focal points worth highlighting: specimen trees, water features, stonework, or architectural details. Limit accent lighting to three to five features: more creates visual chaos. Use the triangle principle: place fixtures in asymmetric triangles rather than straight lines to create depth and avoid a runway effect.
Sketch a scaled site plan showing buildings, hardscape, plantings, and intended fixture locations. This helps calculate cable runs and transformer capacity before buying components. A proper lighting layout prevents over- or under-lighting and ensures balanced illumination across the property.
Calculate total wattage by adding all planned fixtures. Low-voltage systems (12V or 24V) are standard for landscape lighting and require a transformer sized at 120% to 150% of total load to prevent voltage drop and allow future expansion. A 300-watt transformer, for example, should power no more than 200 to 250 watts of fixtures.
Voltage drop becomes critical on runs longer than 50 feet. Use heavier gauge wire, 10 AWG or 12 AWG, for main runs from the transformer, then branch to fixtures with 14 AWG or 16 AWG. Undersized wire causes dim, uneven lighting at the end of the run.
Group fixtures into zones controlled by the transformer’s built-in timer or a separate photocell. Zoning allows different areas to operate on independent schedules, front yard security lighting might run dusk to dawn, while backyard accent lighting shuts off at 11 p.m.
Consider seasonal changes. Deciduous trees that provide dramatic uplighting in summer disappear in winter, shifting the visual focus to evergreens or hardscape. Adjustable fixtures and modular layouts adapt as the landscape matures.
Installation Tips for DIY Brass Landscape Lighting
Low-voltage landscape lighting is one of the most DIY-friendly electrical projects, no permit required in most jurisdictions, and the shock risk is minimal. That said, proper technique prevents headaches later.
Start by mounting the transformer near an outdoor GFCI outlet, typically on an exterior wall or garage. The transformer should be at least 12 inches above grade to prevent water contact during heavy rain or snow melt. Many units include a stake for ground mounting, but wall mounting is more durable.
Run main cable lines (10 AWG or 12 AWG) from the transformer along fence lines, behind planting beds, or under mulch where they won’t be disturbed by digging or foot traffic. Bury cable 6 to 8 inches deep in planting beds and 12 inches deep where mowers or equipment might cross. Use a flat spade to slice a narrow trench, lay the cable at the bottom, and press the turf back in place, no need for conduit in low-traffic areas.
For under-hardscape crossings (driveways, patios), run cable through 1/2-inch or 3/4-inch PVC conduit buried at least 12 inches deep. Mark conduit ends with small flags or stakes so future digging doesn’t sever the wire.
Most brass fixtures connect via quick-splice connectors that pierce the main cable insulation without cutting. These speed installation but can corrode over time. For permanent, weatherproof connections, strip the cable and fixtures wires, twist them together, secure with a waterproof wire nut filled with dielectric grease, and wrap the connection with self-sealing silicone tape. Bury splices in small junction boxes or waterproof housings.
Before backfilling trenches, test the full circuit. Turn on the transformer and verify all fixtures illuminate at full brightness. Dim or flickering lights indicate poor connections, undersized wire, or a defective fixture.
Adjust fixture aim during installation, uplight angles look different at night than they do during setup. Set up a work light or wait until dusk for the first test run, then tweak positions and angles. Once dialed in, backfill trenches and tamp soil firmly around path light stakes to prevent shifting.
Wear gloves when handling brass fixtures fresh from the box, skin oils accelerate tarnish. If you prefer the polished look initially, wipe fixtures with a clean rag before installation.
Maintaining Your Brass Landscape Lighting
Brass fixtures require minimal upkeep, but periodic attention keeps them operating reliably and looking their best, or developing that patina you want.
Lens cleaning matters most. Dirt, pollen, and algae accumulate on glass or polycarbonate lenses, reducing light output by 30% or more. Every three to six months, wipe lenses with a soft cloth and mild soapy water. Avoid abrasive cleaners that scratch protective coatings.
For comprehensive outdoor lighting care, inspect connections annually. Open quick-splice connectors and check for corrosion (white or green buildup). Clean corroded connections with a wire brush, apply dielectric grease, and reseal. Replace connectors showing advanced corrosion.
Bulb replacement in LED fixtures is rare, quality emitters last 25,000 to 50,000 hours. Halogen bulbs burn out more frequently: keep spares on hand. When changing bulbs, avoid touching the glass with bare fingers, oils from skin cause hot spots that shorten halogen bulb life. Use a clean cloth or the bulb’s packaging.
If you want to maintain a polished brass finish, clean fixtures every few months with a brass polish or a paste of lemon juice and baking soda. Rinse thoroughly and dry completely. For a protective barrier that slows tarnish, apply a thin coat of paste wax or Renaissance Wax after polishing.
Most homeowners prefer the natural patina that develops, it’s self-protecting and blends into garden settings. The verde patina (green-blue) takes longer to form in dry climates than humid coastal areas. You can accelerate patina with commercial solutions or let nature handle it.
Seasonal tasks include trimming plants that overgrow fixtures, re-aiming spotlights as trees grow, and checking that in-ground fixtures remain level and free of debris. After heavy mulching or soil amendments, verify that well lights haven’t been buried, they need the top flush with grade to shed water properly.
Transformer timers and photocells can drift or fail. Test the system’s on/off cycle seasonally and recalibrate as needed. Most digital timers include battery backup: replace the battery every two to three years to maintain programming during power outages.


